
Stop the Drip: Your Ultimate Guide to Identifying and Fixing a Kitchen Leak
Discovering a kitchen leak can be a homeowner’s nightmare. That persistent drip, the growing water stain, and the nagging worry about potential damage can quickly escalate into a major headache. But don’t panic! This comprehensive guide is designed to empower you with the knowledge and skills to identify, address, and even prevent kitchen leaks, saving you time, money, and stress. We’ll delve into the common causes, provide step-by-step troubleshooting methods, and offer expert tips for effective repairs. Consider this your go-to resource for understanding and conquering any kitchen leak situation, protecting your home and your peace of mind.
Understanding the Anatomy of a Kitchen Leak
A kitchen leak isn’t always as simple as a dripping faucet. It can originate from various sources, each requiring a different approach to diagnose and fix. To effectively tackle a leak, it’s crucial to understand its potential origins and the underlying causes. Leaks can range from minor annoyances to significant structural threats, so prompt identification is key.
Common Sources of Kitchen Leaks
- Faucet Leaks: Dripping faucets are often the first sign of trouble. These can stem from worn-out washers, O-rings, or corroded valve seats.
- Sink Drain Leaks: Leaks around the sink drain often involve loose connections, damaged pipes (especially the P-trap), or deteriorated plumber’s putty.
- Supply Line Leaks: The flexible hoses that connect your faucet to the water supply can develop cracks or loose connections over time.
- Appliance Leaks: Dishwashers and refrigerators with ice makers are common culprits. Leaks can occur due to faulty hoses, damaged pumps, or malfunctioning valves.
- Countertop Leaks: Water can seep through cracks in the countertop sealant or around the edges of the sink.
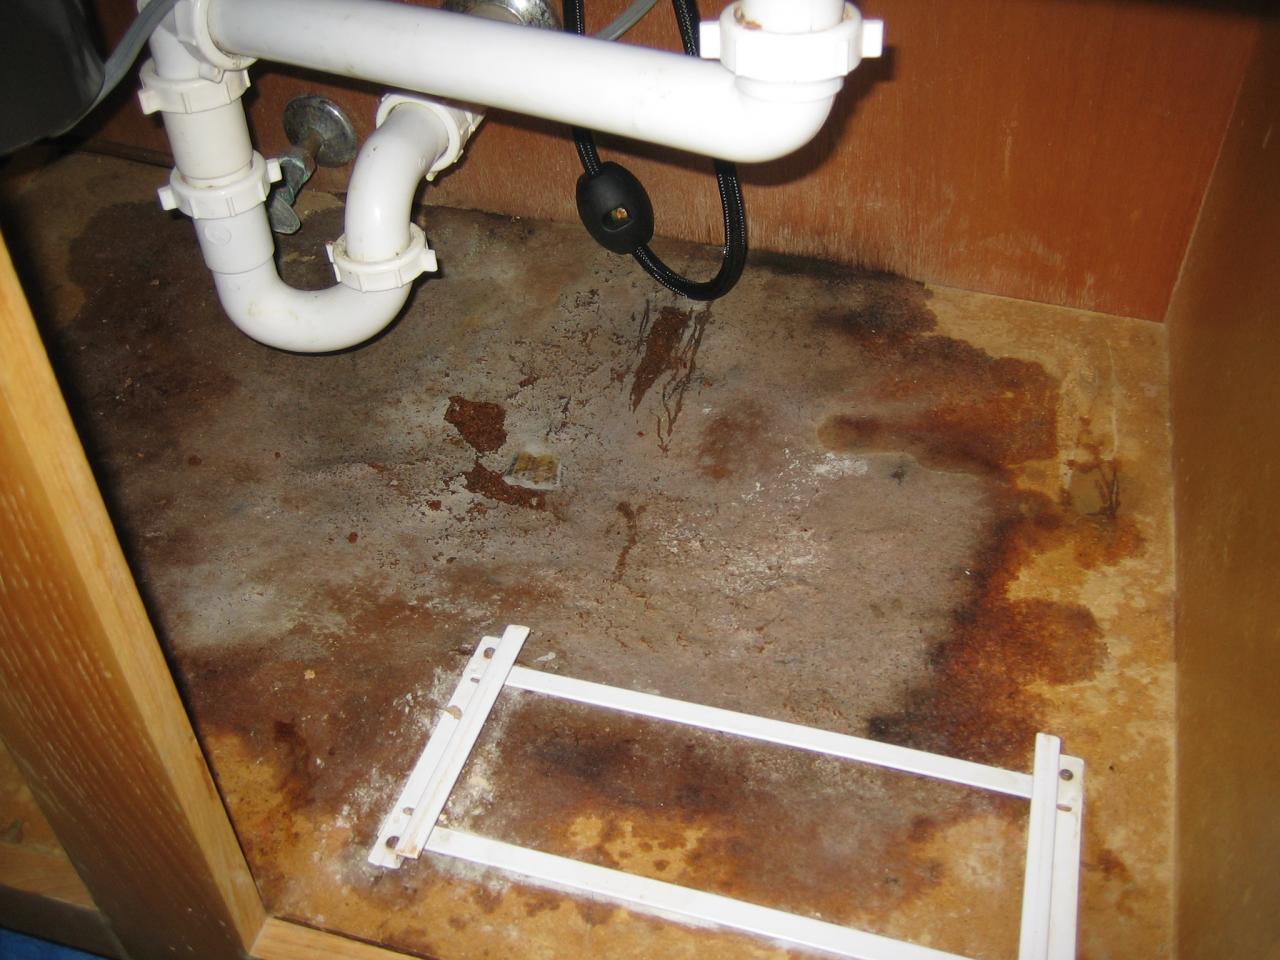
- Under-Sink Cabinet Leaks: These leaks are often hidden and can cause significant damage before being detected.
The Impact of a Kitchen Leak
Ignoring a kitchen leak, even a small one, can lead to a cascade of problems. The most immediate concern is water damage, which can warp cabinets, ruin flooring, and create unsightly stains. Prolonged exposure to moisture also creates a breeding ground for mold and mildew, posing serious health risks. Furthermore, a seemingly minor leak can waste a significant amount of water over time, leading to higher water bills. In severe cases, undetected leaks can even compromise the structural integrity of your home.
Essential Tools and Materials for Leak Detection and Repair
Before you start hunting for the source of your kitchen leak, make sure you have the right tools and materials on hand. Having these readily available will streamline the process and allow you to address the issue efficiently. A well-stocked toolkit can make all the difference between a quick fix and a frustrating ordeal.
- Flashlight or Headlamp: Essential for illuminating dark corners and hard-to-reach areas under the sink.
- Adjustable Wrench: Used to tighten or loosen nuts and bolts on pipes and fittings.
- Basin Wrench: A specialized wrench designed for working on faucet connections in tight spaces.
- Plumber’s Tape (Teflon Tape): Used to seal threaded pipe connections and prevent leaks.
- Plumber’s Putty: Used to create a watertight seal around sink drains and faucets.
- Screwdrivers (Phillips and Flathead): Needed for removing faucet handles and other components.
- Pliers: Useful for gripping and manipulating small parts.
- Towels and Buckets: To absorb water and prevent further damage.
- Safety Glasses and Gloves: To protect your eyes and hands from debris and chemicals.
Pinpointing the Source: A Step-by-Step Leak Detection Guide
Finding the exact source of a kitchen leak can sometimes feel like detective work. However, by following a systematic approach, you can significantly increase your chances of success. This step-by-step guide will walk you through the process, helping you identify the culprit and develop a targeted solution.
- Start with a Visual Inspection: Begin by thoroughly examining the area around the sink, faucet, and under-sink cabinet. Look for any signs of water damage, such as stains, discoloration, or mold growth.
- Check the Faucet: Turn the faucet on and off, paying close attention to the base and spout. Look for drips or leaks around the handle or where the spout connects to the base.
- Inspect the Drain: Fill the sink with water and then release the drain. Observe the drainpipe and connections for any leaks. Pay particular attention to the P-trap, which is a common source of leaks.
- Examine the Supply Lines: Check the flexible hoses that connect the faucet to the water supply. Look for cracks, bulges, or leaks around the connections.
- Investigate Appliances: If you have a dishwasher or refrigerator with an ice maker, inspect the hoses and connections for any signs of leaks. Run the appliance through a cycle and observe for any water escaping.
- Dry the Area and Observe: If you can’t immediately identify the source of the leak, dry the area thoroughly with towels. Then, monitor the area closely for any new water droplets or dampness. This can help you pinpoint the exact location of the leak.
DIY Repair Strategies for Common Kitchen Leaks
Once you’ve identified the source of your kitchen leak, you can often tackle the repair yourself. Many common leaks can be fixed with basic tools and readily available parts. However, if you’re uncomfortable working with plumbing, it’s always best to call a qualified professional. Safety first!
Fixing a Dripping Faucet
A dripping faucet is one of the most common kitchen leak problems. Here’s how to fix it:
- Turn off the water supply: Locate the shut-off valves under the sink and turn them off.
- Disassemble the faucet: Remove the faucet handle and any decorative trim.
- Identify the worn parts: Examine the washers, O-rings, and valve seats for wear or damage.
- Replace the worn parts: Purchase replacement parts at your local hardware store.
- Reassemble the faucet: Carefully reassemble the faucet, ensuring all parts are properly seated.
- Turn on the water supply: Slowly turn on the water supply and check for leaks.
Repairing a Sink Drain Leak
Leaks around the sink drain often involve loose connections or damaged pipes. Here’s how to fix it:
- Tighten loose connections: Use an adjustable wrench to tighten any loose nuts or bolts on the drainpipe.
- Replace damaged pipes: If the drainpipe is cracked or damaged, replace it with a new one.
- Apply plumber’s putty: Remove the drain flange and apply a fresh layer of plumber’s putty around the edge. Reinstall the flange and tighten the nut underneath.
Addressing Supply Line Leaks
Supply line leaks can be caused by cracked hoses or loose connections. Here’s how to fix it:
- Tighten loose connections: Use an adjustable wrench to tighten the connections at both ends of the supply line.
- Replace damaged hoses: If the hose is cracked or damaged, replace it with a new one. Be sure to use the correct size and type of hose.
When to Call a Professional Plumber
While many kitchen leak repairs can be handled as DIY projects, there are situations where it’s best to call a professional plumber. Attempting to fix complex plumbing issues without the proper knowledge and experience can lead to further damage and costly repairs. Knowing when to call in the experts can save you time, money, and unnecessary stress.
- Extensive Water Damage: If the leak has caused significant water damage to your cabinets, flooring, or walls, it’s important to have a professional assess the situation and make necessary repairs.
- Hidden Leaks: If you suspect a leak behind walls or under floors, it’s best to call a plumber to locate and repair the source of the leak.
- Complex Plumbing Systems: If you have an older home with complex plumbing systems, it’s wise to consult with a plumber before attempting any repairs.
- No DIY Experience: If you’re uncomfortable working with plumbing or lack the necessary tools, it’s always best to call a professional.
Preventative Measures: Avoiding Kitchen Leaks in the First Place
The best way to deal with a kitchen leak is to prevent it from happening in the first place. By taking proactive measures, you can significantly reduce the risk of leaks and protect your home from water damage. Regular maintenance and careful attention to detail can go a long way in preventing plumbing problems.
- Regularly Inspect Plumbing: Periodically check your faucets, drains, and supply lines for any signs of leaks or damage.
- Tighten Loose Connections: Use an adjustable wrench to tighten any loose connections on pipes and fittings.
- Replace Worn Parts: Replace worn-out washers, O-rings, and hoses before they cause leaks.
- Avoid Over-Tightening: When tightening connections, avoid over-tightening, as this can damage the pipes and fittings.
- Use Quality Materials: When replacing plumbing parts, use high-quality materials that are designed to last.
- Properly Insulate Pipes: In cold climates, insulate your pipes to prevent them from freezing and bursting.
Expert Tips for Maintaining Your Kitchen Plumbing
Maintaining your kitchen plumbing is essential for preventing leaks and ensuring the longevity of your plumbing system. Here are some expert tips to help you keep your kitchen plumbing in top condition:
- Flush the Water Heater: Regularly flush your water heater to remove sediment buildup, which can corrode the tank and cause leaks.
- Avoid Drain Cleaners: Harsh chemical drain cleaners can damage your pipes and cause leaks. Instead, use a natural drain cleaner or a plumbing snake to clear clogs.
- Be Mindful of What Goes Down the Drain: Avoid pouring grease, oil, or food scraps down the drain, as these can cause clogs and lead to leaks.
- Monitor Water Pressure: High water pressure can strain your plumbing system and cause leaks. If your water pressure is too high, install a pressure regulator.
- Consider a Water Leak Detector: Install a water leak detector under your sink to alert you to any leaks before they cause significant damage.
Taking Control of Kitchen Leaks
A kitchen leak, while often stressful, doesn’t have to be a major crisis. By understanding the potential causes, knowing how to identify the source, and having the right tools and knowledge, you can effectively address many common leak problems yourself. Remember to prioritize safety and don’t hesitate to call a professional plumber when needed. Proactive maintenance and preventative measures are key to keeping your kitchen plumbing in top condition and avoiding costly repairs. Taking these steps will not only protect your home but also provide peace of mind, knowing you’re prepared to handle any plumbing challenge that comes your way. Share your experiences with kitchen leaks in the comments below – your insights could help others!
