Stop the Drip: Your Comprehensive Guide to Sink Leaks
Discovering a sink leak is never a welcome surprise. Whether it’s a persistent drip, a steady stream, or a full-blown gush, a sink leaking can quickly escalate from a minor annoyance to a major problem, causing water damage, increasing your water bill, and potentially fostering mold growth. This comprehensive guide is your go-to resource for understanding, diagnosing, and resolving sink leaks, empowering you to tackle the issue head-on and prevent future occurrences. We’ll cover everything from identifying the source of the leak to exploring repair options, ensuring you have the knowledge and confidence to address this common household headache.
Understanding the Anatomy of a Sink and Its Plumbing
Before diving into leak detection and repair, it’s crucial to understand the basic components of a sink and its associated plumbing. This knowledge will help you pinpoint the source of the leak more accurately and choose the appropriate solution.
- Faucet: The faucet is the fixture that controls the flow of water into the sink. It consists of handles (or a single lever), a spout, and internal valves that regulate water pressure and temperature.
- Supply Lines: These flexible tubes connect the faucet to the hot and cold water supply pipes.
- Drain Assembly: This includes the sink strainer, the drainpipe, the P-trap, and the tailpiece.
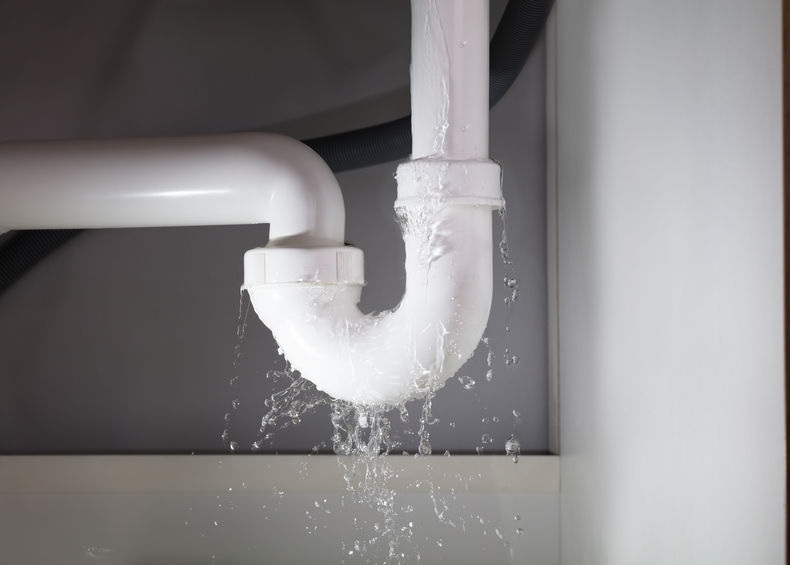
- P-Trap: The curved section of pipe under the sink that traps water, preventing sewer gases from entering your home.
- Shut-Off Valves: Located under the sink on the supply lines, these valves allow you to turn off the water supply to the faucet without shutting off water to the entire house.
Common Causes of Sink Leaking: A Detailed Breakdown
Sink leaks can arise from various issues, each requiring a specific approach. Here’s a breakdown of the most common culprits:
- Faulty Faucet O-Rings and Washers: Over time, the O-rings and washers inside the faucet can wear out, crack, or become brittle, leading to leaks around the faucet handle or spout.
- Loose or Corroded Supply Lines: The connections between the supply lines and the faucet or shut-off valves can loosen, or the lines themselves can corrode, causing leaks.
- Damaged Drain Assembly: Cracks, loose connections, or deteriorated putty around the sink strainer can cause leaks in the drain assembly.
- Clogged P-Trap: A clogged P-trap can cause water to back up and leak from the connections.
- High Water Pressure: Excessively high water pressure can strain the plumbing system and cause leaks at various points.
Diagnosing the Source of the Leak: A Step-by-Step Guide
Identifying the exact source of the leak is the first and most crucial step in the repair process. Follow these steps to pinpoint the problem:
- Dry the Area: Thoroughly dry the area under and around the sink with a clean cloth.
- Observe Carefully: Turn on the faucet and carefully observe where the water is coming from. Use a flashlight to get a better view of hard-to-reach areas.
- Check the Faucet: Look for leaks around the base of the faucet, the spout, and the handles.
- Inspect the Supply Lines: Check the connections at both ends of the supply lines for leaks. Also, look for signs of corrosion or damage to the lines themselves.
- Examine the Drain Assembly: Check the sink strainer, drainpipe connections, and P-trap for leaks. Run water down the drain to check for leaks while the drain is in use.
- Tighten Connections: If you find a loose connection, try tightening it with a wrench. Be careful not to overtighten, as this can damage the pipes.
Essential Tools and Materials for Sink Leak Repair
Having the right tools and materials on hand will make the repair process much smoother and more efficient. Here’s a list of essential items:
- Adjustable Wrench: For tightening and loosening nuts and bolts.
- Basin Wrench: For reaching hard-to-access nuts on the faucet.
- Plumber’s Tape (Teflon Tape): For sealing threaded connections.
- Plumber’s Putty: For sealing the sink strainer to the sink.
- Screwdrivers (Phillips and Flathead): For removing and installing screws.
- Pliers: For gripping and manipulating small parts.
- Bucket: For catching water.
- Clean Cloths or Towels: For drying and cleaning.
- Replacement Parts: O-rings, washers, supply lines, drain parts, etc. (as needed).
Repairing Faucet Leaks: A Detailed Guide
Faucet leaks are often caused by worn-out O-rings or washers. Here’s how to repair them:
- Turn Off the Water Supply: Locate the shut-off valves under the sink and turn them off.
- Disassemble the Faucet: Carefully disassemble the faucet according to the manufacturer’s instructions. This usually involves removing the handles and spout.
- Identify and Replace Worn Parts: Examine the O-rings and washers for signs of wear or damage. Replace them with new parts of the same size and type.
- Reassemble the Faucet: Carefully reassemble the faucet, making sure all parts are properly aligned and tightened.
- Turn On the Water Supply: Slowly turn on the water supply and check for leaks.
Addressing Supply Line Leaks: A Practical Approach
Supply line leaks can often be resolved by tightening the connections or replacing the lines. Here’s how:
- Turn Off the Water Supply: Locate the shut-off valves under the sink and turn them off.
- Tighten Connections: Use an adjustable wrench to tighten the connections at both ends of the supply line.
- Replace the Supply Line (if necessary): If tightening the connections doesn’t stop the leak, or if the supply line is corroded or damaged, replace it with a new one of the same length and type.
- Wrap Threads with Teflon Tape: Before connecting the new supply line, wrap the threads with plumber’s tape to ensure a tight seal.
- Turn On the Water Supply: Slowly turn on the water supply and check for leaks.
Fixing Drain Assembly Leaks: A Comprehensive Solution
Drain assembly leaks can be tricky to fix, but with patience and the right tools, you can often resolve them yourself. Here’s how:
- Turn Off the Water Supply: While not always necessary, it’s a good practice to turn off the water supply to prevent accidental spills.
- Disassemble the Drain Assembly: Carefully disassemble the drain assembly, starting with the P-trap.
- Inspect the Parts: Examine the drainpipe, P-trap, and sink strainer for cracks or damage.
- Replace Damaged Parts: Replace any damaged parts with new ones of the same size and type.
- Apply Plumber’s Putty: When reinstalling the sink strainer, apply a generous amount of plumber’s putty around the underside of the strainer flange to create a watertight seal.
- Reassemble the Drain Assembly: Carefully reassemble the drain assembly, making sure all connections are tight.
- Test for Leaks: Run water down the drain and check for leaks.
Preventive Measures: Avoiding Future Sink Leaks
Prevention is always better than cure. Here are some tips to prevent sink leaks from occurring in the first place:
- Regularly Inspect Your Plumbing: Periodically check under your sinks for signs of leaks, corrosion, or damage.
- Tighten Loose Connections: If you notice any loose connections, tighten them with a wrench.
- Replace Worn Parts: Replace worn O-rings, washers, and supply lines before they fail.
- Avoid Over-Tightening: Be careful not to overtighten connections, as this can damage the pipes.
- Use Strainers: Use strainers in your sink drains to prevent clogs.
- Flush Drains Regularly: Flush your drains with hot water and baking soda to prevent buildup.
- Monitor Water Pressure: Ensure your home’s water pressure is within the recommended range (40-60 psi).
When to Call a Professional Plumber
While many sink leaks can be repaired DIY, some situations require the expertise of a professional plumber. Call a plumber if:
- You’re unable to identify the source of the leak.
- The leak is severe or causing significant water damage.
- You’re uncomfortable working with plumbing.
- You suspect a more serious plumbing problem, such as a burst pipe.
Choosing the Right Plumbing Service: Factors to Consider
Selecting a reliable and qualified plumber is crucial for ensuring the job is done correctly and safely. Consider the following factors when choosing a plumbing service:
- Licensing and Insurance: Ensure the plumber is licensed and insured.
- Experience and Expertise: Look for a plumber with experience in repairing sink leaks and other plumbing problems.
- Reputation: Check online reviews and ask for references.
- Pricing: Get a written estimate before the work begins.
- Warranty: Ask about the plumber’s warranty on their work.
The Financial Impact of Ignoring a Sink Leak
Ignoring a seemingly minor sink leak can lead to significant financial consequences. The constant dripping can substantially increase your water bill, and the excess moisture can create a breeding ground for mold and mildew, potentially requiring costly remediation. Furthermore, prolonged water exposure can damage cabinets, flooring, and even the structural integrity of your home, leading to extensive and expensive repairs. Addressing a sink leak promptly is a financially responsible decision that can save you money and protect your property in the long run.
Navigating Sink Leak Repairs: Common Mistakes to Avoid
While DIY repairs can be empowering, it’s essential to be aware of potential pitfalls. One common mistake is overtightening connections, which can strip threads and cause further damage. Another is using the wrong type of replacement parts, leading to compatibility issues and ineffective repairs. It’s also crucial to properly prepare the area before starting the repair, ensuring the water supply is shut off and the surrounding area is protected from spills. By avoiding these common mistakes, you can increase your chances of a successful and long-lasting repair.
Sink Leaks and Water Conservation: A Responsible Approach
Addressing sink leaks promptly is not only a matter of saving money and protecting your property but also a responsible approach to water conservation. Even a small, persistent drip can waste a significant amount of water over time, contributing to water scarcity and environmental concerns. By fixing leaks promptly and adopting water-saving habits, such as using low-flow faucets and showerheads, you can make a positive impact on the environment and help conserve this precious resource for future generations.
Expert Insights on Sink Leak Prevention and Maintenance
According to leading plumbing experts, regular maintenance is key to preventing sink leaks. This includes periodically inspecting your plumbing for signs of wear and tear, tightening loose connections, and replacing worn parts before they fail. Experts also recommend using high-quality plumbing fixtures and materials, which are more durable and less prone to leaks. Additionally, maintaining proper water pressure is crucial, as excessive pressure can strain the plumbing system and increase the risk of leaks. By following these expert tips, you can minimize the likelihood of sink leaks and extend the lifespan of your plumbing system.
Is Your Sink Leaking? Take Action Now!
Sink leaks, while often appearing minor, can quickly escalate into costly and damaging problems. By understanding the causes, diagnosis methods, and repair techniques outlined in this guide, you’re well-equipped to tackle most common sink leak issues. Regular inspection and preventative maintenance can minimize future issues, saving you time, money, and stress. Don’t let a small drip turn into a major headache. Take action today to protect your home and conserve water. Share your own sink leak experiences in the comments below and help others learn from your insights.
