Stop the Drip: Expert Guide to Fixing Leaking Delta Kitchen Faucets
Is that persistent drip, drip, drip driving you crazy? A leaking Delta kitchen faucet is a common household nuisance, but thankfully, it’s often a problem you can tackle yourself with the right knowledge and tools. This comprehensive guide provides you with expert insights and step-by-step instructions to diagnose and fix your leaking Delta faucet, saving you money and frustration. We’ll cover everything from identifying the source of the leak to replacing worn-out parts, ensuring a long-lasting solution. Our goal is to empower you with the confidence and expertise to resolve this issue efficiently.
Understanding Why Delta Kitchen Faucets Leak
Delta faucets, renowned for their durability and stylish designs, are still susceptible to leaks over time. Understanding the common causes of these leaks is the first step toward effective repair. Leaks rarely indicate a flaw in the faucet itself, but rather the normal wear and tear of internal components.
The most frequent culprits include:
- Worn-out O-rings and Seals: These rubber components provide a watertight seal between various faucet parts. Over time, they can dry out, crack, or become brittle, leading to leaks.
- Damaged Cartridges: Cartridge faucets rely on a cartridge to control water flow and temperature. Mineral buildup, debris, or simply age can damage the cartridge, causing drips or leaks.
- Loose Connections: The connections between the faucet body, supply lines, and sprayer hose can loosen over time due to vibrations or temperature changes.
- High Water Pressure: Excessively high water pressure can put undue stress on faucet components, accelerating wear and tear and increasing the likelihood of leaks.
- Corroded Valve Seats: Valve seats are the contact points where the cartridge or ball valve seals against the faucet body. Corrosion or mineral buildup on these seats can prevent a tight seal.
Delta faucets utilize different mechanisms depending on the model. Single-handle faucets often use cartridges or ball valves, while two-handle faucets typically use compression valves or ceramic disc cartridges. Knowing the type of faucet you have is crucial for accurate diagnosis and repair.
Delta Faucet Cartridge Technology: A Closer Look
Delta’s proprietary DIAMOND Seal Technology exemplifies their commitment to leak prevention and long-term durability. This technology incorporates a diamond-embedded ceramic disc cartridge, offering exceptional hardness and resistance to wear. According to Delta Faucet Company’s engineering data, this design significantly reduces leak points and extends the lifespan of the faucet. The InnoFlex PEX supply lines also contribute to leak prevention by providing a durable and flexible connection between the faucet and the water supply.
Essential Tools and Materials for Faucet Repair
Before you begin, gather the necessary tools and materials. Having everything on hand will make the repair process smoother and more efficient. Here’s a comprehensive list:
- Adjustable Wrench: For loosening and tightening nuts and connections.
- Basin Wrench (Faucet Wrench): Specifically designed for accessing hard-to-reach nuts under the sink.
- Screwdrivers (Phillips and Flathead): For removing handles and accessing internal components.
- Pliers: For gripping and manipulating small parts.
- Allen Wrench Set: For removing set screws on some faucet handles.
- Penetrating Oil: To loosen stubborn nuts and bolts.
- White Vinegar: For removing mineral deposits.
- New O-rings and Seals: Purchase a faucet repair kit that matches your Delta faucet model.
- Replacement Cartridge: If the cartridge is damaged, purchase a new one specifically designed for your faucet model.
- Plumber’s Grease: To lubricate O-rings and seals for easier installation and a better seal.
- Clean Rags or Sponges: For cleaning and wiping up spills.
- Bucket: To catch water during disassembly.
- Safety Glasses: To protect your eyes from debris.
Step-by-Step Guide to Diagnosing the Leak
Pinpointing the source of the leak is essential for a successful repair. Carefully inspect your faucet while it’s running to identify where the water is escaping. Here’s a systematic approach:
- Check the Base of the Faucet: Leaks around the base often indicate a problem with the O-rings or seals that connect the faucet to the sink.
- Inspect the Handle: Water dripping from the handle area usually suggests a worn-out cartridge or O-rings within the handle assembly.
- Examine the Spout: A dripping spout, even when the faucet is turned off, is a classic sign of a faulty cartridge or valve seat.
- Look Under the Sink: Check the supply lines and connections for any signs of leaks. Tighten any loose connections with an adjustable wrench.
- Observe the Sprayer Hose: If you have a pull-down or pull-out sprayer, inspect the hose and connections for leaks. Cracks or loose connections are common culprits.
Once you’ve identified the source of the leak, you can proceed with the appropriate repair.
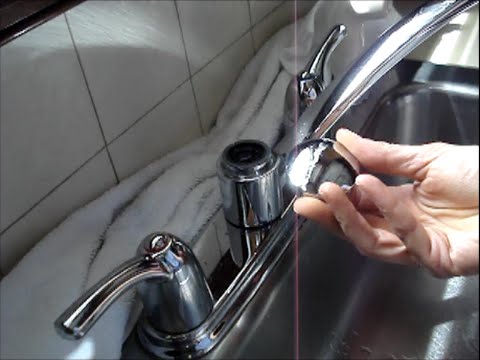
Repairing a Leaky Single-Handle Delta Cartridge Faucet
Repairing a single-handle Delta cartridge faucet typically involves replacing the cartridge and any associated O-rings or seals. Here’s a detailed guide:
- Turn Off the Water Supply: Locate the shut-off valves under the sink and turn them clockwise to shut off the water supply to the faucet.
- Protect the Sink: Place a towel or cloth in the sink to protect the finish from scratches.
- Remove the Handle: Depending on the model, the handle may be held in place by a set screw or a decorative cap. Use an Allen wrench or screwdriver to remove the set screw or pop off the cap. Then, loosen and remove the handle.
- Remove the Cartridge Retaining Clip: Use pliers to carefully remove the retaining clip that holds the cartridge in place. This clip may be stiff, so apply gentle but firm pressure.
- Remove the Old Cartridge: Grasp the stem of the cartridge with pliers and gently pull it straight up. You may need to wiggle it slightly to loosen it.
- Clean the Faucet Body: Use a clean cloth or sponge to remove any mineral deposits or debris from the faucet body where the cartridge sits.
- Install the New Cartridge: Lubricate the new cartridge with plumber’s grease and insert it into the faucet body. Make sure it’s properly aligned.
- Reinstall the Retaining Clip: Reinstall the retaining clip to secure the cartridge in place.
- Reinstall the Handle: Reattach the handle and tighten the set screw or replace the decorative cap.
- Turn On the Water Supply: Slowly turn the shut-off valves counterclockwise to restore the water supply. Check for leaks.
Addressing Leaks in Two-Handle Delta Faucets
Two-handle Delta faucets often use compression valves or ceramic disc cartridges. The repair process varies depending on the type of valve or cartridge used. Generally, compression valves are more prone to leaking due to worn-out rubber washers. Replacing these washers is usually a straightforward process.
- Shut Off the Water: As with any plumbing repair, begin by shutting off the water supply to the faucet.
- Disassemble the Handle: Remove the handle by unscrewing any visible screws or removing a decorative cap to access the screw.
- Remove the Valve Stem: Use a wrench to unscrew the valve stem from the faucet body.
- Replace the Washer: At the end of the valve stem, you’ll find a rubber washer held in place by a screw. Remove the screw and replace the old washer with a new one.
- Reassemble the Valve: Reassemble the valve stem and handle, and turn the water supply back on.
Advanced Leak Prevention Strategies
Beyond addressing immediate leaks, there are several proactive measures you can take to prevent future problems:
- Regularly Inspect Your Faucet: Periodically check for any signs of leaks or drips, even if they seem minor. Addressing small problems early can prevent them from escalating into major repairs.
- Clean Mineral Deposits: Mineral buildup can damage faucet components and contribute to leaks. Regularly clean your faucet with a solution of white vinegar and water to remove mineral deposits.
- Lubricate Moving Parts: Lubricate O-rings, seals, and cartridges with plumber’s grease to keep them supple and prevent them from drying out.
- Control Water Pressure: Install a water pressure regulator to maintain consistent water pressure and prevent excessive stress on your faucet.
- Use a Water Softener: If you have hard water, consider installing a water softener to reduce mineral buildup in your plumbing system.
Choosing the Right Replacement Parts
When replacing faucet parts, it’s crucial to use genuine Delta replacement parts or high-quality aftermarket parts that are specifically designed for your faucet model. Using generic or inferior parts can compromise the performance and longevity of your faucet. Delta Faucet Company offers a wide range of replacement parts, including cartridges, O-rings, seals, handles, and spouts. You can find these parts at most home improvement stores or online retailers.
When to Call a Professional Plumber
While many faucet repairs can be handled by homeowners, there are certain situations where it’s best to call a professional plumber:
- Extensive Corrosion: If the faucet body or internal components are heavily corroded, it may be difficult to disassemble the faucet without causing further damage.
- Broken Pipes: If you accidentally break a pipe while attempting to repair the faucet, it’s essential to call a plumber immediately to prevent water damage.
- Lack of Experience: If you’re not comfortable working with plumbing or you’re unsure about any aspect of the repair process, it’s best to err on the side of caution and call a professional.
- Persistent Leaks: If you’ve tried multiple repair attempts and the faucet continues to leak, there may be an underlying problem that requires professional attention.
Delta Faucet Warranty and Support
Delta Faucet Company offers a limited lifetime warranty on its faucets, covering defects in materials and workmanship. If your faucet is still under warranty, you may be able to get replacement parts or a replacement faucet free of charge. Contact Delta Faucet Company’s customer service department for more information about warranty coverage and support. Their website provides extensive documentation and troubleshooting guides, and their customer service representatives are knowledgeable and helpful.
Fixing Leaks Saves Water and Money
Addressing a leaking Delta kitchen faucet isn’t just about eliminating an annoying drip; it’s also about conserving water and saving money. A seemingly small leak can waste a significant amount of water over time, leading to higher water bills. By fixing the leak promptly, you can reduce your water consumption and lower your utility costs. Furthermore, repairing your faucet instead of replacing it is a more sustainable choice that reduces waste and conserves resources.
Expert Tips for a Leak-Free Kitchen
Repairing a leaking Delta kitchen faucet is a manageable task with the right knowledge and tools. By understanding the common causes of leaks, following our step-by-step repair guides, and implementing preventative measures, you can keep your faucet in top condition and avoid costly water waste. Remember to always prioritize safety, use genuine replacement parts, and don’t hesitate to call a professional plumber if you’re unsure about any aspect of the repair process. With a little effort, you can enjoy a leak-free kitchen and save money on your water bill.
