Stop the Drip: Expert Guide to Finding Leaks in Your One-Handle Kitchen Faucet
Is that incessant drip, drip, drip driving you mad? A leaky one-handle kitchen sink faucet is more than just an annoyance; it’s a waste of water and money. But before you call a plumber, you can often diagnose and even fix the problem yourself. This comprehensive guide will walk you through the process of how to find leak in one handle kitchen sink faucet, step-by-step, saving you time, money, and frustration. We’ll cover everything from identifying the source of the leak to the tools and techniques needed for a successful repair. Our experience shows that with a systematic approach, even a novice can tackle this common household issue.
Unlike generic plumbing guides, we’ll focus specifically on the nuances of one-handle faucets, which are the most common type in modern kitchens. We’ll delve into the inner workings of these faucets, explore the common culprits behind leaks, and provide detailed instructions for disassembly, inspection, and repair. By the end of this article, you’ll have the knowledge and confidence to tackle that leaky faucet head-on.
Understanding the Anatomy of Your One-Handle Kitchen Faucet
Before diving into leak detection, it’s crucial to understand the basic components of a one-handle kitchen faucet. These faucets are designed for convenience, allowing you to control both water flow and temperature with a single lever. However, this simplicity can sometimes make troubleshooting leaks a bit more challenging.
Here’s a breakdown of the key parts:
- Handle: The lever you use to control water flow and temperature.
- Spout: The curved or angled part of the faucet from which water flows.
- Aerator: A screen at the end of the spout that mixes air with water to create a smoother flow.
- Cartridge: The heart of the faucet, controlling the mixing of hot and cold water.
- O-rings and Seals: Small rubber rings that create watertight seals between various components.
- Valve Body: The main housing of the faucet, containing the cartridge and water inlets.
- Supply Lines: Flexible tubes that connect the faucet to the hot and cold water supply pipes.
Understanding how these components interact is essential for pinpointing the source of a leak. A leak from the base of the faucet, for example, likely indicates a problem with the O-rings or seals, while a leak from the spout might point to a faulty cartridge.
Common Causes of Leaks in One-Handle Kitchen Faucets
Leaks in one-handle kitchen faucets rarely occur spontaneously. They are typically the result of wear and tear, mineral buildup, or damage to internal components. Identifying the underlying cause is the first step towards a lasting repair.
Here are some of the most common culprits:
- Worn-Out O-Rings and Seals: Over time, the rubber O-rings and seals inside the faucet can dry out, crack, or become brittle, leading to leaks around the base of the spout or handle.
- Damaged Cartridge: The cartridge is responsible for controlling water flow and temperature. If it becomes cracked, worn, or clogged with mineral deposits, it can cause leaks from the spout or around the handle.
- Loose Connections: The supply lines connecting the faucet to the water supply can sometimes loosen over time, resulting in leaks under the sink.
- Corroded Valve Body: In older faucets, the valve body itself can corrode, leading to leaks from various points.
- High Water Pressure: Excessively high water pressure can put stress on the faucet’s internal components, accelerating wear and tear and increasing the risk of leaks.
Step-by-Step Guide to Finding the Leak
Now that you understand the common causes of leaks, let’s get down to the business of finding the source of your specific leak. This process involves a combination of visual inspection, careful observation, and a bit of detective work.
Step 1: Gather Your Tools and Supplies
Before you start, gather the following tools and supplies:
- Screwdrivers (Phillips and flathead)
- Adjustable wrench
- Penetrating oil (e.g., WD-40)
- New O-rings and seals (matching your faucet model)
- New cartridge (if necessary)
- Clean cloths or towels
- Basin or bucket
- Plumber’s tape
Step 2: Shut Off the Water Supply
This is the most crucial step! Locate the shut-off valves under your sink and turn them clockwise until they are completely closed. If you don’t have individual shut-off valves, you’ll need to shut off the main water supply to your house.
Step 3: Inspect the Faucet Exterior
Carefully examine the faucet for any visible signs of leaks. Look for water droplets, mineral buildup, or corrosion around the following areas:
- Base of the spout
- Handle
- Aerator
- Supply line connections
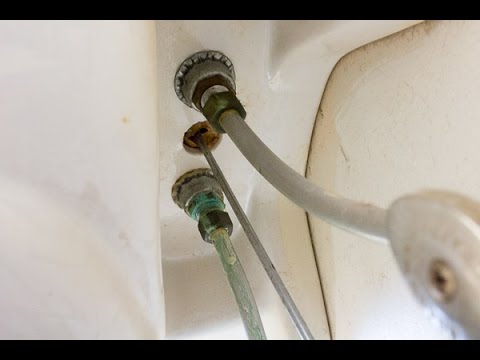
Step 4: Check the Under-Sink Area
Inspect the area under the sink for any signs of leaks. Look for water stains, dampness, or dripping from the supply lines or drain pipes.
Step 5: Disassemble the Faucet (Carefully!)
This is where things get a bit more involved. The exact disassembly process will vary depending on your faucet model, but here are the general steps:
- Remove the Handle: Most one-handle faucets have a small setscrew that secures the handle to the valve stem. Use a small Allen wrench or screwdriver to loosen the setscrew and remove the handle.
- Remove the Decorative Cap or Escutcheon: Underneath the handle, you’ll usually find a decorative cap or escutcheon that covers the valve body. Use a flathead screwdriver to gently pry it off.
- Remove the Retaining Clip or Nut: Depending on your faucet model, you may find a retaining clip or nut that holds the cartridge in place. Remove it carefully, noting its orientation.
- Remove the Cartridge: Grasp the cartridge firmly and pull it straight up and out of the valve body. You may need to wiggle it gently to loosen it.
Important Note: Take pictures or videos of each step of the disassembly process. This will be invaluable when it comes time to reassemble the faucet.
Step 6: Inspect the Internal Components
Once you’ve disassembled the faucet, carefully inspect the following components:
- Cartridge: Look for cracks, wear, or mineral buildup.
- O-Rings and Seals: Check for dryness, cracks, or brittleness.
- Valve Body: Inspect for corrosion or damage.
Replace any damaged or worn components. If you’re unsure whether a component is still good, it’s always best to replace it.
Step 7: Reassemble the Faucet
Follow the disassembly steps in reverse order to reassemble the faucet. Be sure to:
- Lubricate the O-rings and seals with plumber’s grease before installing them.
- Tighten all connections securely, but not overtighten.
- Double-check that all components are properly aligned.
Step 8: Test for Leaks
After reassembling the faucet, slowly turn the water supply back on and check for leaks. If you still see leaks, you may need to disassemble the faucet again and re-inspect the components.
Advanced Troubleshooting Tips
Sometimes, finding the source of a leak can be more challenging than expected. Here are some advanced troubleshooting tips to help you pinpoint the problem:
- Use a Dry Cloth: Dry the area around the faucet thoroughly with a clean cloth. Then, turn on the water and watch carefully to see where the first drops of water appear.
- Use a Mirror: A small mirror can be helpful for inspecting hard-to-reach areas under the sink.
- Check the Aerator: A clogged or damaged aerator can sometimes cause leaks. Remove the aerator and clean it thoroughly or replace it if necessary.
- Consider a Pressure Regulator: If you suspect that high water pressure is contributing to the leaks, consider installing a pressure regulator on your main water supply line.
Choosing the Right Replacement Parts: A Deep Dive
Selecting the correct replacement parts is paramount for a successful and long-lasting faucet repair. Don’t just grab the cheapest option; invest in quality components that are compatible with your specific faucet model. Here’s a detailed look at what to consider:
Cartridge Selection: The Heart of the Matter
The cartridge is arguably the most crucial replacement part. When selecting a new cartridge, consider these factors:
- Faucet Model Compatibility: This is non-negotiable. Your new cartridge MUST be designed for your specific faucet make and model. Consult your faucet’s documentation or the manufacturer’s website.
- Material Quality: Opt for cartridges made from durable materials like brass or ceramic. These materials are more resistant to wear and tear and will provide a longer lifespan.
- Flow Rate: Ensure the new cartridge has a similar flow rate to your old one. A significantly different flow rate can affect water pressure and temperature control.
O-Rings and Seals: The Unsung Heroes
O-rings and seals may seem insignificant, but they play a vital role in preventing leaks. When replacing these components:
- Match Size and Material: Use O-rings and seals that are the exact same size and material as the originals. Incorrect sizes or materials can lead to leaks or premature failure.
- Consider Silicone or EPDM: Silicone and EPDM (ethylene propylene diene monomer) are excellent materials for O-rings and seals due to their resistance to water, heat, and chemicals.
- Lubricate Properly: Always lubricate O-rings and seals with plumber’s grease before installation. This will help them seat properly and prevent damage.
The Importance of Regular Faucet Maintenance
Preventive maintenance is key to extending the life of your kitchen faucet and avoiding costly repairs. Here are some simple steps you can take to keep your faucet in top condition:
- Clean the Aerator Regularly: Mineral buildup can clog the aerator and reduce water flow. Remove the aerator periodically and clean it with vinegar or a descaling solution.
- Check for Leaks Regularly: Inspect your faucet for leaks at least once a month. The sooner you catch a leak, the easier it will be to fix.
- Avoid Abrasive Cleaners: Abrasive cleaners can damage the finish of your faucet. Use mild soap and water to clean the exterior.
- Don’t Overtighten Connections: Overtightening connections can damage the faucet’s internal components. Tighten connections securely, but not excessively.
When to Call a Professional Plumber
While many faucet leaks can be fixed with DIY repairs, there are some situations where it’s best to call a professional plumber. These include:
- Extensive Corrosion: If the valve body or other critical components are heavily corroded, it may be necessary to replace the entire faucet.
- Frozen or Damaged Pipes: If you suspect that your pipes are frozen or damaged, it’s best to call a plumber to avoid further damage.
- Lack of Experience or Confidence: If you’re not comfortable disassembling or repairing your faucet, don’t hesitate to call a plumber. It’s better to be safe than sorry.
Understanding Faucet Cartridge Types and Their Impact on Leak Prevention
The cartridge in your one-handle kitchen faucet is the control center, dictating water flow and temperature. Different cartridge types exist, each with unique mechanisms and susceptibility to leaks. Understanding these differences can aid in both leak prevention and diagnosis.
Compression Cartridges: The Old Guard
These are among the oldest designs, relying on rubber washers that compress against a valve seat to stop water flow. While durable, the washers are prone to wear and tear, leading to drips. Signs of a failing compression cartridge include:
- Dripping even when the handle is tightly closed.
- Difficulty turning the handle.
- Noisy operation.
Ball-Type Cartridges: A Step Up
Ball-type cartridges use a slotted ball that rotates to control water flow and temperature. They offer smoother operation than compression cartridges but contain numerous O-rings and seals that can degrade over time. Look for these symptoms:
- Leaks from the base of the handle.
- Reduced water pressure.
- Jerky handle movement.
Ceramic Disc Cartridges: The Modern Standard
Ceramic disc cartridges are the most modern and durable type. They use two ceramic discs that slide against each other to control water flow. Their smooth operation and resistance to wear make them less prone to leaks. However, mineral buildup can still cause problems. Watch out for:
- Dripping from the spout.
- Difficulty adjusting water temperature.
- Grinding noises during operation.
The Environmental and Economic Impact of Fixing Leaks
Addressing a leaky faucet isn’t just about saving money on your water bill; it’s also about contributing to environmental conservation. Even a small drip can waste a significant amount of water over time. Here’s a look at the broader implications:
- Water Conservation: Leaks contribute to water scarcity, especially in drought-prone areas. Fixing leaks helps conserve this precious resource.
- Reduced Water Bills: A dripping faucet can add up to a surprisingly high water bill. Repairing the leak can save you money each month.
- Energy Savings: If you have a hot water leak, you’re also wasting energy used to heat the water. Fixing the leak reduces your energy consumption and lowers your utility bills.
- Environmental Responsibility: Conserving water and energy helps reduce your environmental footprint and protect the planet.
Taking Control of Your Kitchen Plumbing
Finding and fixing a leak in your one-handle kitchen sink faucet might seem daunting at first, but with a systematic approach and the right tools, it’s a manageable task for most homeowners. By understanding the anatomy of your faucet, identifying the common causes of leaks, and following our step-by-step guide, you can save money, conserve water, and gain a sense of accomplishment. Remember, regular maintenance is key to preventing future leaks and extending the life of your faucet. If you encounter a problem that’s beyond your skill level, don’t hesitate to call a professional plumber. Share your experiences with fixing leaky faucets in the comments below – your insights could help others tackle their own plumbing challenges.
