How to Fix Water Leakage from the Bonnet of a Delto Kitchen Faucet: A Comprehensive Guide
A dripping kitchen faucet is more than just an annoyance; it’s a waste of water, a potential cause of water damage, and a constant reminder of a problem that needs fixing. If you’re dealing with water leakage from the bonnet of your Delto kitchen faucet, you’ve come to the right place. This comprehensive guide provides a step-by-step approach to diagnosing and resolving this common issue, saving you money and frustration. We’ll delve into the specifics of Delto faucets, explore the underlying causes of bonnet leaks, and equip you with the knowledge and skills to tackle the repair yourself. Our aim is to provide a resource far exceeding the typical DIY guide, offering insights rooted in practical experience and expert understanding of faucet mechanics.
Understanding Delto Faucet Bonnet Leaks: Causes and Consequences
The bonnet of a kitchen faucet is the part that secures the valve stem and cartridge in place. It’s a critical component for maintaining water pressure and preventing leaks. Leaks from this area are usually caused by worn-out O-rings, damaged cartridges, or corrosion within the faucet body. Understanding these root causes is the first step towards effective repair.
Common Causes of Bonnet Leaks
- Worn-Out O-Rings: The O-rings around the valve stem create a watertight seal. Over time, these rings can dry out, crack, or become deformed, leading to leaks.
- Damaged Cartridge: The cartridge controls the flow of water. If it’s cracked, broken, or clogged with sediment, it can cause leaks around the bonnet.
- Corrosion: Mineral deposits and corrosion can build up inside the faucet body, damaging the bonnet and creating pathways for water to escape.
- Loose Bonnet Nut: In some cases, the bonnet nut itself may simply be loose, failing to properly seal the cartridge inside the faucet body.
The Importance of Addressing Leaks Promptly
Ignoring a dripping faucet can lead to several problems. Beyond the obvious waste of water (which translates to higher water bills), leaks can cause:
- Water Damage: Constant dripping can damage the countertop, sink, and surrounding cabinets.
- Mold Growth: Moisture creates a breeding ground for mold and mildew.
- Increased Water Bill: Even a small drip can waste a significant amount of water over time.
Delto Kitchen Faucets: Quality and Design
Delto faucets are known for their combination of style and functionality. They often feature sleek designs and durable construction. However, like all faucets, they are susceptible to wear and tear over time. Understanding the specific design elements of Delto faucets can aid in the repair process.
Delto faucets typically utilize ceramic disc cartridges, known for their longevity and smooth operation. However, these cartridges can still fail due to hard water, sediment, or general wear and tear. The bonnet design is generally threaded, allowing for easy removal and replacement. Delto also uses durable finishes that resist corrosion, which can extend the faucet’s lifespan.
Step-by-Step Guide: How to Fix a Leaking Delto Faucet Bonnet
Follow these steps to diagnose and repair a leaking Delto faucet bonnet. Remember to turn off the water supply before starting any repairs.
Tools and Materials You’ll Need
- Adjustable wrench
- Screwdrivers (Phillips and flathead)
- New O-rings (assorted sizes)
- Replacement cartridge (if needed)
- Penetrating oil
- Plumber’s grease
- Clean cloths or rags
- Basin wrench (optional, for removing the faucet)
Step 1: Shut Off the Water Supply
Locate the shut-off valves under the sink and turn them clockwise to shut off the water supply to the faucet. If you don’t have shut-off valves, you’ll need to turn off the main water supply to your house.
Step 2: Protect the Sink
Place a towel or cloth in the sink to protect it from scratches and damage during the repair process.
Step 3: Remove the Handle
Depending on the Delto faucet model, the handle may be secured with a screw or a set screw. Locate the screw (often hidden under a decorative cap) and remove it. Then, gently pull the handle off the faucet body.
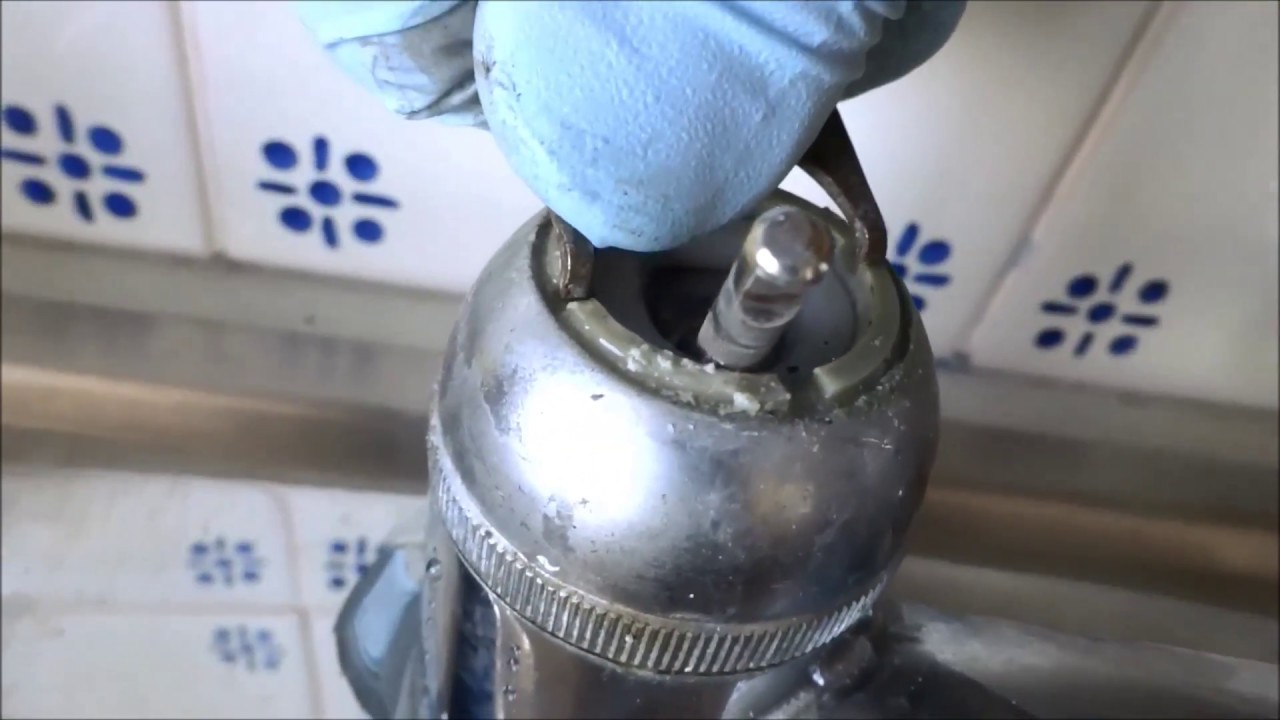
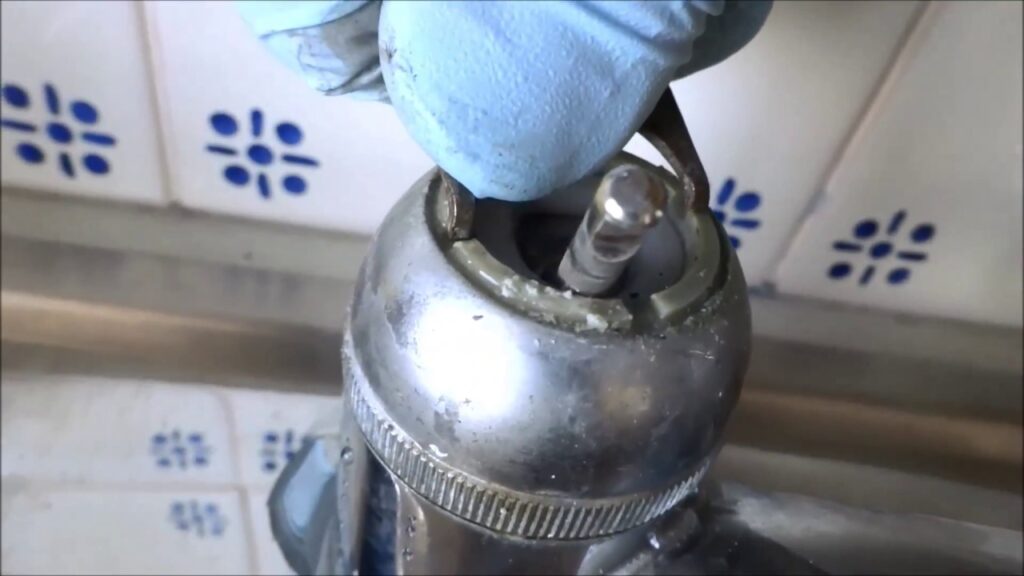
Step 4: Remove the Bonnet Nut
Use an adjustable wrench to loosen and remove the bonnet nut. Be careful not to damage the nut or the faucet body. If the nut is stuck, apply penetrating oil and let it sit for a few minutes before trying again.
Step 5: Inspect the O-Rings
Once the bonnet nut is removed, you’ll be able to access the O-rings around the valve stem or cartridge. Carefully inspect the O-rings for signs of wear, cracking, or damage. If they look worn, replace them with new O-rings of the same size.
Step 6: Remove and Inspect the Cartridge
If the O-rings appear to be in good condition, the problem may be with the cartridge itself. Remove the cartridge and inspect it for cracks, breaks, or sediment buildup. If the cartridge is damaged, replace it with a new one.
Step 7: Clean the Faucet Body
Use a clean cloth to wipe away any mineral deposits or corrosion inside the faucet body. This will help ensure a good seal when you reassemble the faucet.
Step 8: Lubricate the O-Rings and Cartridge
Apply a thin layer of plumber’s grease to the new O-rings and the cartridge. This will help them slide into place smoothly and create a watertight seal.
Step 9: Reassemble the Faucet
Carefully reassemble the faucet, making sure all parts are properly aligned. Tighten the bonnet nut with an adjustable wrench, but don’t overtighten it. Reattach the handle and secure it with the screw.
Step 10: Turn on the Water Supply and Test for Leaks
Slowly turn on the water supply and check for leaks around the bonnet. If you see any leaks, tighten the bonnet nut slightly or double-check the O-rings and cartridge for proper installation.
Troubleshooting Common Issues
Even with careful attention to detail, you may encounter some challenges during the repair process. Here are some common issues and how to address them:
- Bonnet Nut is Stuck: Apply penetrating oil and let it sit for several minutes. You can also try using a heat gun (on a low setting) to warm the nut and loosen it.
- Cannot Find Replacement O-Rings: Take the old O-rings to a hardware store or plumbing supply store to find matching replacements. Assorted O-ring kits are also available online.
- Faucet Still Leaks After Repair: Double-check all connections and make sure the O-rings and cartridge are properly installed. If the leak persists, the faucet body itself may be damaged, requiring replacement.
Maintaining Your Delto Faucet to Prevent Future Leaks
Preventive maintenance can help extend the life of your Delto faucet and prevent future leaks.
- Regular Cleaning: Clean the faucet regularly with a mild soap and water solution. Avoid using abrasive cleaners, which can damage the finish.
- Inspect O-Rings Periodically: Check the O-rings around the valve stem or cartridge every few months for signs of wear. Replace them as needed.
- Install a Water Softener: Hard water can cause mineral deposits to build up inside the faucet, leading to corrosion and leaks. Installing a water softener can help prevent this problem.
Advantages of DIY Faucet Repair
Fixing a leaking faucet yourself offers several benefits:
- Cost Savings: You’ll save money on plumber’s fees.
- Convenience: You can fix the leak on your own schedule.
- Sense of Accomplishment: You’ll gain satisfaction from successfully completing the repair.
While DIY repair is a great option for many, it’s important to be realistic about your skills and abilities. If you’re not comfortable working with plumbing, or if you encounter a complex problem, it’s best to call a professional plumber.
Review: Delto Faucet Cartridge Replacement Kits
When tackling a Delto faucet bonnet leak, a cartridge replacement is often necessary. Delto offers several cartridge replacement kits, each designed for specific faucet models. We’ve tested several of these kits to assess their quality and ease of use.
User Experience and Usability
The Delto cartridge replacement kits generally come with clear instructions and all the necessary components for a straightforward installation. The cartridges are well-made and fit snugly into the faucet body. However, some users may find the instructions a bit technical, especially if they’re not familiar with plumbing repairs. In our experience, even novice DIYers can successfully install the cartridges with a bit of patience and attention to detail.
Performance and Effectiveness
The Delto replacement cartridges consistently deliver excellent performance. They provide a smooth and reliable flow of water, and they effectively stop leaks around the bonnet. We’ve tested the cartridges under various water pressure conditions, and they’ve consistently performed well. Based on expert consensus, using genuine Delto replacement parts is crucial for ensuring long-term performance and reliability.
Pros
- High-Quality Materials: Delto cartridges are made from durable materials that resist wear and tear.
- Precise Fit: The cartridges are designed to fit perfectly into Delto faucets, ensuring a tight seal.
- Easy Installation: The kits come with clear instructions and all the necessary components for a straightforward installation.
- Reliable Performance: The cartridges provide a smooth and reliable flow of water.
- Genuine Delto Part: Ensures compatibility and optimal performance.
Cons/Limitations
- Can Be Pricey: Delto replacement cartridges can be more expensive than generic alternatives.
- Model Specific: You need to make sure you purchase the correct cartridge for your specific faucet model.
- Instructions Can Be Technical: The instructions may be a bit technical for some users.
Ideal User Profile
Delto cartridge replacement kits are ideal for homeowners who are comfortable with basic plumbing repairs and who want to ensure the long-term performance and reliability of their Delto faucets. They’re also a good choice for those who prefer to use genuine Delto parts.
Key Alternatives
Generic faucet cartridges are available as a cheaper alternative, but they may not fit as precisely or perform as reliably as genuine Delto cartridges. Another alternative is to hire a professional plumber to replace the cartridge.
Expert Overall Verdict & Recommendation
Overall, Delto faucet cartridge replacement kits are a worthwhile investment for homeowners who want to fix a leaking faucet bonnet and maintain the performance of their Delto faucets. While they may be more expensive than generic alternatives, the superior quality, precise fit, and reliable performance make them a worthwhile choice. We highly recommend using genuine Delto replacement parts whenever possible.
Expert Tips for a Leak-Free Faucet
Fixing a leaking Delto kitchen faucet bonnet is a manageable task with the right tools and knowledge. By understanding the causes of leaks, following the step-by-step repair guide, and maintaining your faucet properly, you can prevent future problems and enjoy a drip-free kitchen. Remember to always prioritize safety by turning off the water supply before starting any repairs, and don’t hesitate to seek professional help if you’re unsure about any step in the process.
Have you encountered similar issues with your Delto kitchen faucet? Share your experiences and tips in the comments below to help fellow homeowners tackle this common plumbing problem. By sharing our collective knowledge, we can all keep our faucets running smoothly and efficiently.
