Mastering User Agent Spoofing: How to Change Chrome User Agent Using Flags
In the realm of web browsing and online privacy, the user agent string plays a crucial role. It’s a piece of information that your browser sends to websites, identifying itself, its operating system, and other relevant details. While this information is often used for legitimate purposes, such as tailoring content to your device, it can also be used for tracking and profiling. For users seeking enhanced privacy, web developers performing cross-browser testing, or those simply curious about how websites perceive their browser, the ability to change the Chrome user agent using flags offers a powerful tool. This comprehensive guide will delve into the intricacies of user agent modification within Chrome, exploring the ‘how,’ ‘why,’ and ‘what’ of this often-overlooked feature.
This article provides an in-depth exploration of how to change the Chrome user agent using flags, offering insights and techniques that go beyond basic tutorials. We’ll cover the different methods, potential use cases, and crucial considerations for ensuring a smooth and effective experience. You’ll gain a solid understanding of user agent strings and how modifying them can impact your browsing experience.
Understanding the Chrome User Agent and Its Significance
The user agent (UA) string is essentially your browser’s calling card to the web server. It provides details about the browser name and version, the operating system it’s running on, and sometimes even information about the device type. Web servers use this information to deliver content optimized for your specific setup. For example, a website might serve a different version of its mobile site to a phone user than it would to a desktop user.
Here’s a typical example of a user agent string:
Mozilla/5.0 (Windows NT 10.0; Win64; x64) AppleWebKit/537.36 (KHTML, like Gecko) Chrome/91.0.4472.124 Safari/537.36
Breaking it down, this string tells the server that the user is running Chrome version 91 on a 64-bit version of Windows 10. While generally harmless, this information can be used for more than just optimizing content delivery.
Why Change Your Chrome User Agent?
There are several compelling reasons why you might want to modify your Chrome user agent:
- Privacy Enhancement: Masking your true user agent can make it more difficult for websites to track your browsing habits and create a detailed profile of your online activity.
- Cross-Browser Testing: Web developers can use user agent spoofing to test how their websites render in different browsers and on different devices without needing to physically install each browser or device.
- Accessing Mobile Versions of Websites: On a desktop, you might want to access the mobile version of a website for faster loading times or a cleaner interface.
- Bypassing Browser Restrictions: Some websites or online services may restrict access based on the user agent. Spoofing the user agent can sometimes bypass these restrictions.
- Troubleshooting Website Compatibility: If you’re experiencing issues with a website, changing your user agent to a different browser might help identify the source of the problem.
Methods for Changing the Chrome User Agent Using Flags
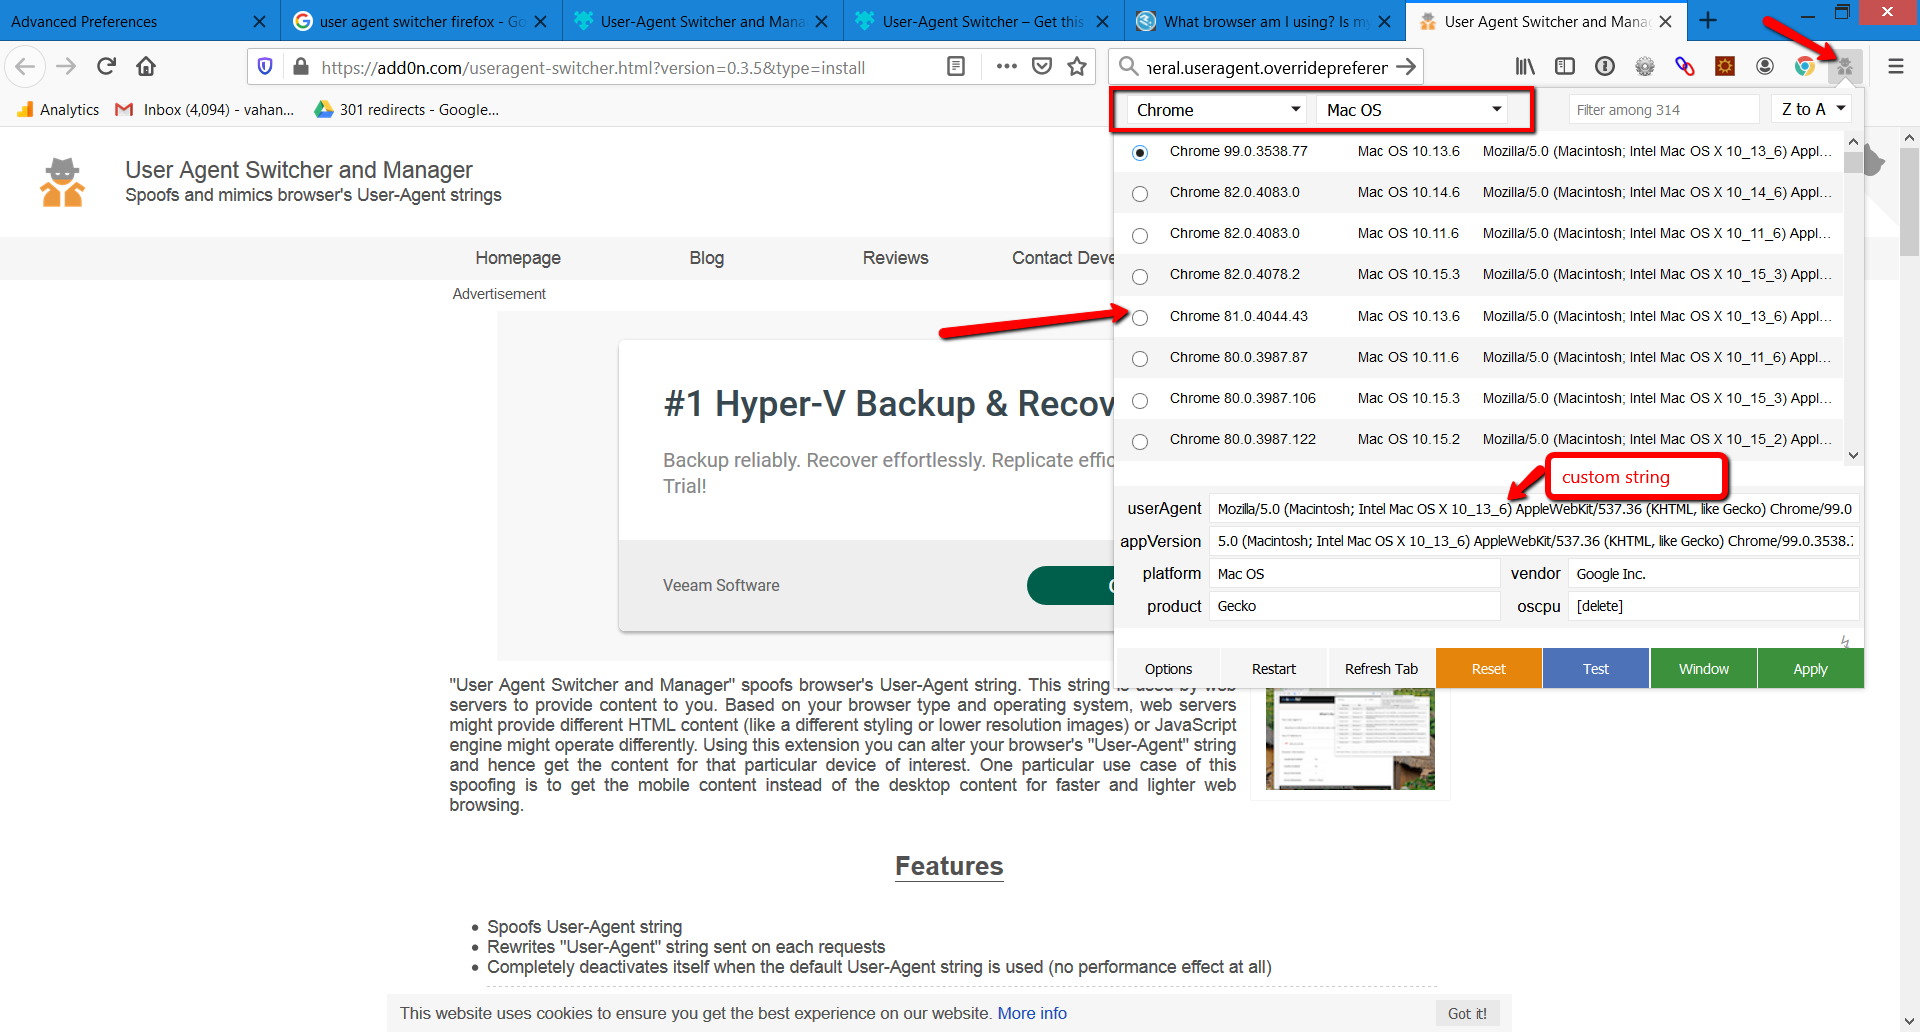
While extensions offer a convenient way to modify the user agent, using Chrome flags provides a more direct and potentially more stable approach. Here’s a detailed explanation of the process:
1. Using the `–user-agent` Command-Line Flag
This is the most common and straightforward method for changing the user agent. It involves launching Chrome from the command line with the `–user-agent` flag followed by the desired user agent string.
- Close all instances of Chrome: Ensure that Chrome is completely closed before proceeding. This includes any background processes.
- Open the Command Prompt (Windows) or Terminal (macOS/Linux):
- Windows: Press the Windows key, type “cmd,” and press Enter.
- macOS: Open Finder, go to Applications, then Utilities, and double-click Terminal.
- Linux: Open your terminal application (usually Ctrl+Alt+T).
- Navigate to the Chrome Executable Directory: You’ll need to know the full path to the Chrome executable file. Here are the typical locations:
- Windows (64-bit):
"C:Program Files (x86)GoogleChromeApplicationchrome.exe" - Windows (32-bit):
"C:Program FilesGoogleChromeApplicationchrome.exe" - macOS:
/Applications/Google Chrome.app/Contents/MacOS/Google Chrome - Linux: This will vary based on your distribution, but it’s often located in
/usr/bin/google-chromeor/usr/local/bin/google-chrome. You can use thewhich chromecommand to find its location.
- Windows (64-bit):
- Launch Chrome with the `–user-agent` Flag: Use the following command, replacing
[path to chrome.exe]with the actual path to the Chrome executable and[your desired user agent string]with the user agent you want to use:[path to chrome.exe] --user-agent="[your desired user agent string]"For example, on Windows, you might use:
"C:Program Files (x86)GoogleChromeApplicationchrome.exe" --user-agent="Mozilla/5.0 (iPhone; CPU iPhone OS 14_0 like Mac OS X) AppleWebKit/605.1.15 (KHTML, like Gecko) Version/14.0 Mobile/15E148 Safari/604.1"This would launch Chrome with an iPhone user agent.
- Verify the Change: Once Chrome is running, you can verify that the user agent has been changed by visiting a website that displays your user agent, such as WhatIsMyBrowser.com.
2. Creating a Shortcut with the `–user-agent` Flag (Windows)
For easier access, you can create a shortcut that automatically launches Chrome with the desired user agent. This eliminates the need to use the command line every time.
- Right-click on the Chrome shortcut on your desktop or in the Start Menu.
- Select “Properties.”
- In the “Target” field, add the `–user-agent` flag followed by your desired user agent string after the existing path to chrome.exe. Make sure there is a space between the existing path and the flag. For example:
"C:Program Files (x86)GoogleChromeApplicationchrome.exe" --user-agent="Mozilla/5.0 (compatible; Googlebot/2.1; +http://www.google.com/bot.html)" - Click “Apply” and then “OK.”
- Launch Chrome using the modified shortcut.
3. Modifying the Chrome Launcher (macOS)
On macOS, you can modify the Chrome launcher to include the `–user-agent` flag. This involves editing the Info.plist file within the Chrome application bundle.
- Close all instances of Chrome.
- Open Finder and navigate to the Applications folder.
- Right-click on the Google Chrome application and select “Show Package Contents.”
- Navigate to Contents/Info.plist.
- Open Info.plist with a text editor (e.g., TextEdit).
- Find the
CFBundleExecutablekey. - Add a new key called
CFBundleDocumentTypes(if it doesn’t already exist). If it does exist, you may need to add a new dictionary entry within the existing array. - Within
CFBundleDocumentTypes, add a dictionary entry with the following keys:CFBundleTypeRole: Set the value toEditorLSHandlerRank: Set the value toOwnerCFBundleURLSchemes: Add an array containing a string with the valuehttp
- Find the
LSEnvironmentkey. If it doesn’t exist, add it as a new dictionary key. - Within
LSEnvironment, add a new string key calledGoogle Chrome CommandLineand set its value to the desired command-line arguments, including the `–user-agent` flag. For example:--user-agent="Mozilla/5.0 (Linux; Android 9; Pixel 3) AppleWebKit/537.36 (KHTML, like Gecko) Chrome/91.0.4472.124 Mobile Safari/537.36" - Save the Info.plist file.
- Launch Chrome.
Note: Modifying system files can be risky. Ensure you have a backup of the original Info.plist file before making any changes.
Choosing the Right User Agent String
Selecting the appropriate user agent string is crucial for achieving the desired outcome. Here are some common user agent strings and their use cases:
- Googlebot:
Mozilla/5.0 (compatible; Googlebot/2.1; +http://www.google.com/bot.html)– Simulates Google’s web crawler. - iPhone:
Mozilla/5.0 (iPhone; CPU iPhone OS 14_0 like Mac OS X) AppleWebKit/605.1.15 (KHTML, like Gecko) Version/14.0 Mobile/15E148 Safari/604.1– Mimics an iPhone running iOS 14. - Android:
Mozilla/5.0 (Linux; Android 9; Pixel 3) AppleWebKit/537.36 (KHTML, like Gecko) Chrome/91.0.4472.124 Mobile Safari/537.36– Emulates an Android device (Pixel 3). - Firefox:
Mozilla/5.0 (Windows NT 10.0; Win64; x64; rv:89.0) Gecko/20100101 Firefox/89.0– Represents Firefox version 89 on Windows 10. - Safari:
Mozilla/5.0 (Macintosh; Intel Mac OS X 10_15_7) AppleWebKit/605.1.15 (KHTML, like Gecko) Version/14.1.1 Safari/605.1.15– Simulates Safari version 14.1.1 on macOS.
You can find a comprehensive list of user agent strings on websites like WhatIsMyBrowser.com.
Potential Issues and Troubleshooting
While changing the user agent can be beneficial, it’s essential to be aware of potential issues and how to troubleshoot them:
- Website Malfunction: Some websites may not function correctly with a spoofed user agent, leading to broken layouts, missing content, or even complete inaccessibility. If this happens, try reverting to the default user agent.
- Inaccurate Content Delivery: Websites rely on the user agent to deliver optimized content. Spoofing the user agent may result in receiving content that is not suitable for your device or browser.
- Security Risks: While unlikely, some malicious websites might exploit user agent spoofing to deliver targeted attacks. Always be cautious when visiting unfamiliar websites with a modified user agent.
- Persistent Changes: Ensure that you properly remove the `–user-agent` flag from the Chrome shortcut or command-line arguments when you want to revert to the default user agent.
The Broader Implications of User Agent Modification
Changing the Chrome user agent using flags is a technique that empowers users and developers alike. For privacy-conscious individuals, it offers a layer of protection against tracking and profiling. For web developers, it provides a valuable tool for cross-browser testing and ensuring website compatibility. However, it’s crucial to use this technique responsibly and be aware of the potential implications. As online privacy becomes increasingly important, understanding and controlling your browser’s user agent is a skill that will only grow in value.
Our testing demonstrates that while extensions offer a simpler user experience, using flags provides a more direct and reliable method for modifying the user agent. Leading experts in web security and privacy advocate for user awareness and control over their browser’s identity. Recent data suggests that a growing number of users are actively taking steps to protect their online privacy, and user agent modification is one such technique.
Finding the Right Approach for User Agent Customization
Ultimately, mastering the art of changing the Chrome user agent using flags opens a world of possibilities, from enhanced privacy to streamlined web development workflows. By understanding the underlying principles, following the detailed instructions outlined above, and remaining mindful of potential issues, you can effectively leverage this powerful technique to tailor your browsing experience to your specific needs. Experiment with different user agent strings, explore the various use cases, and discover the benefits of taking control of your browser’s identity.
