Mastering the 36 Yard Zero: Adjusting to 25 Yards for Precision Shooting
Achieving consistent accuracy with any firearm hinges on understanding and properly implementing the concept of zeroing. A common question arises: how does a 36-yard zero target adjustment translate to 25 yards? This comprehensive guide will explore the intricacies of zeroing, ballistic trajectories, and practical adjustments, providing you with the knowledge to confidently and accurately adjust your sights. Whether you’re a seasoned marksman or a novice shooter, understanding these principles is paramount for consistent performance.
Understanding the Fundamentals of Zeroing
Zeroing a firearm means adjusting the sights so that the bullet impacts the point of aim at a specific distance. This distance is known as the ‘zero distance.’ It’s a critical step in ensuring accuracy because bullets don’t travel in a straight line. Gravity and air resistance cause them to drop over distance, creating a curved trajectory. The zero distance is where the bullet’s trajectory intersects the line of sight.
Choosing the right zero distance depends on the intended use of the firearm. For example, a hunting rifle might be zeroed at 200 yards for longer shots, while a pistol used for self-defense might be zeroed at a much shorter distance, such as 15 yards. The 36-yard zero is a popular choice for certain types of rifles, particularly those used in tactical applications or for specific types of hunting.
Why 36 Yards?
The 36-yard zero offers a balance between close-range and mid-range accuracy. It allows for relatively flat trajectory within typical engagement distances. It’s often preferred because it minimizes holdover or under corrections needed for targets within a practical range. The exact reasoning often depends on the specific caliber and intended use, but it generally provides a useful compromise.
Ballistic Trajectory: The Science Behind the Curve
To understand the relationship between a 36-yard zero and a 25-yard adjustment, it’s essential to grasp the concept of ballistic trajectory. As mentioned earlier, a bullet’s path is not a straight line. It’s a curve influenced by several factors, including:
- Gravity: The constant downward pull on the bullet.
- Air Resistance (Drag): The friction between the bullet and the air, slowing it down.
- Bullet Velocity: The speed at which the bullet leaves the barrel.
- Bullet Shape and Weight: These factors affect the bullet’s aerodynamic properties and its resistance to air.
These factors combine to create a predictable, yet complex, curve. When you zero a rifle at 36 yards, you’re essentially making the bullet’s trajectory intersect the line of sight at that specific point. Before and after that point, the bullet will be either above or below the line of sight.
First and Second Zero
A crucial point to understand is that the bullet’s trajectory will actually cross the line of sight twice. The first time is relatively close to the muzzle, and the second time is at the chosen zero distance (in this case, 36 yards). This means that when zeroed at 36 yards, the bullet will also be at the point of aim at a closer distance. This closer distance is what we need to determine for a 25-yard target.
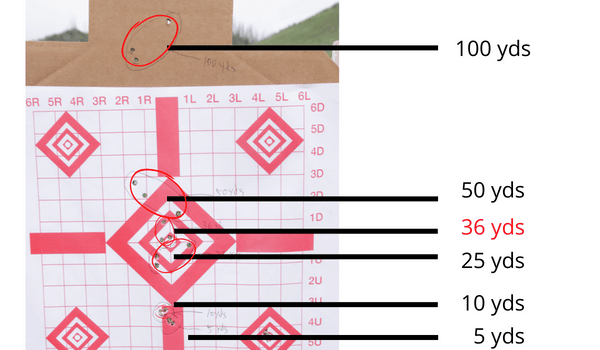
The Relationship Between 36-Yard and 25-Yard Impact
When a rifle is zeroed at 36 yards, the bullet will typically impact slightly high at 25 yards. The exact amount of this ‘high’ impact depends on various factors, including the specific cartridge, bullet weight, and sight height above the bore. However, we can provide a general understanding and methods to determine the precise adjustment needed.
The amount the bullet impacts high at 25 yards is due to the upward angle of the barrel required to reach the 36-yard zero. At the closer 25-yard distance, the bullet hasn’t dropped as much due to gravity, resulting in a higher point of impact.
Making the Adjustment: Practical Methods
There are several ways to determine and implement the necessary adjustment to achieve a 25-yard zero when your rifle is primarily zeroed for 36 yards:
- Ballistic Calculators: These tools allow you to input your cartridge information (bullet weight, velocity, ballistic coefficient), sight height, and zero distance (36 yards). The calculator will then provide a trajectory chart showing the bullet’s drop (or rise) at any given distance, including 25 yards. This is the most precise method.
- Shooting and Adjusting: The most reliable method is to simply shoot at a 25-yard target and adjust your sights accordingly. Start by firing a group of 3-5 shots. Measure the distance between the center of the group and your point of aim. Adjust your sights (either the elevation turret on your scope or the front/rear sights on iron sights) to move the group towards the point of aim. Repeat this process until your shots are consistently hitting the center of the target at 25 yards.
- General Rule of Thumb: As a very general starting point, many shooters find that a rifle zeroed at 36 yards will impact approximately 1-2 inches high at 25 yards. However, this is just an estimate and should not be relied upon without confirmation through actual shooting.
Using Ballistic Calculators for Precision
Ballistic calculators are readily available online and as smartphone apps. They require accurate input data to provide reliable results. Key information includes:
- Bullet Weight: Measured in grains (e.g., 55 grain, 62 grain).
- Muzzle Velocity: The speed of the bullet as it leaves the barrel, measured in feet per second (fps). This is often found on the ammunition box or can be measured with a chronograph.
- Ballistic Coefficient (BC): A measure of the bullet’s aerodynamic efficiency. Higher BC values indicate a more streamlined bullet that retains velocity better. This is also typically found on the ammunition box.
- Sight Height: The distance between the center of your scope (or iron sights) and the center of the bore (the barrel). This is a critical measurement for accurate calculations.
Once you have this information, input it into the ballistic calculator, set the zero distance to 36 yards, and then check the bullet’s trajectory at 25 yards. The calculator will tell you how much the bullet will be above or below the line of sight at 25 yards, allowing you to make the necessary adjustments to your sights.
Shooting and Adjusting: A Step-by-Step Guide
This method involves physically shooting at a target and making sight adjustments based on the impact point. Here’s a detailed guide:
- Set Up Your Target: Place a target at exactly 25 yards. A target with clearly marked grid lines (e.g., 1-inch squares) will make measuring easier.
- Establish a Stable Shooting Position: Use a rest or sandbags to ensure a consistent and stable shooting platform. This minimizes shooter error.
- Fire a Group of Shots: Aim carefully at the center of the target and fire a group of 3-5 shots. Focus on consistent trigger pull and breathing.
- Measure the Group: After firing, carefully measure the distance between the center of your shot group and the center of the target. Measure both the vertical (elevation) and horizontal (windage) distances.
- Adjust Your Sights: Use the adjustment turrets on your scope or the adjustments on your iron sights to move the point of impact towards the center of the target. The amount of adjustment needed will depend on the click value of your sights (e.g., 1/4 MOA per click). Refer to your scope or sight manual for instructions on how to make adjustments.
- Repeat: Fire another group of shots and repeat the measuring and adjusting process until your shots are consistently hitting the center of the target.
Understanding MOA and Sight Adjustments
Many scopes use Minute of Angle (MOA) for their adjustment increments. One MOA is approximately 1 inch at 100 yards. Therefore, at 25 yards, one MOA is approximately 0.25 inches. If your shots are impacting 1 inch high at 25 yards, you would need to adjust your scope down by 4 clicks if your scope has 1/4 MOA per click adjustments.
Some scopes use Milliradians (MILs) instead of MOA. One MIL is approximately 3.6 inches at 100 yards, or 0.9 inches at 25 yards. Always refer to your scope’s manual to understand its adjustment increments.
Factors Affecting Point of Impact
Several factors can influence your point of impact, even after you’ve zeroed your rifle. Being aware of these factors can help you maintain accuracy:
- Ammunition: Different brands or types of ammunition can have different ballistic properties, leading to variations in point of impact. Always use the same type of ammunition when zeroing and shooting for consistency.
- Temperature: Temperature can affect the propellant’s burn rate, which in turn affects muzzle velocity and point of impact.
- Altitude: Higher altitudes have thinner air, which reduces air resistance and can slightly alter the bullet’s trajectory.
- Wind: Wind can significantly affect the bullet’s trajectory, especially at longer distances.
- Shooter Error: Inconsistent shooting technique, such as improper grip, trigger pull, or breathing, can lead to variations in point of impact.
Advanced Considerations: Zero Shift and Environmental Factors
Experienced shooters understand that a zero is not static. It can shift over time due to various factors. Changes in temperature, humidity, and even the way a rifle is stored can subtly affect the barrel and optics, leading to a shift in the zero.
Regularly checking your zero, especially before important events like hunting trips or competitions, is crucial for maintaining accuracy. This is particularly important if you’ve made any changes to your rifle, such as swapping out optics or adding accessories.
Addressing Parallax Error
Parallax is a phenomenon that can cause the reticle in your scope to appear to move relative to the target when your eye is not perfectly aligned with the scope’s optical axis. This can lead to inconsistencies in your point of aim. Many scopes have adjustable parallax settings to correct for this error at different distances. Ensure your scope is properly adjusted for parallax at the distance you are shooting.
The Role of Quality Optics and Equipment
Accurate zeroing and consistent shooting rely heavily on the quality of your optics and equipment. A high-quality scope with precise and repeatable adjustments is essential for making accurate sight adjustments. Similarly, a well-maintained rifle with a consistent trigger pull will contribute to more consistent shot placement.
Investing in quality components is a worthwhile investment for any serious shooter. While expensive equipment doesn’t guarantee accuracy, it provides a more reliable and consistent platform for developing your shooting skills.
Putting It All Together: Achieving Consistent Accuracy
Mastering the art of zeroing and adjusting for different distances requires a combination of knowledge, skill, and attention to detail. By understanding the principles of ballistic trajectory, using the right tools and techniques, and paying attention to environmental factors, you can achieve consistent accuracy with your firearm. Remember to always practice safe gun handling and follow all applicable laws and regulations.
Final Thoughts on Precision Adjustments
Successfully adjusting a 36-yard zero to a 25-yard target requires a solid understanding of ballistics and careful execution. By combining the knowledge presented here with diligent practice, any shooter can achieve the precision they desire. This expertise builds confidence and enhances the overall shooting experience.
