
Is There a Leak Under the Kitchen Sink? A Comprehensive Guide
Discovering moisture under your kitchen sink can be alarming. The question, is there a leak under the kitchen sink?, immediately springs to mind. This comprehensive guide will walk you through identifying leaks, understanding their causes, and exploring solutions, empowering you to tackle this common household problem with confidence and expertise. We’ll delve into the intricacies of plumbing systems, offering insights gleaned from years of experience in home maintenance and repair, ensuring you’re equipped to address the issue effectively.
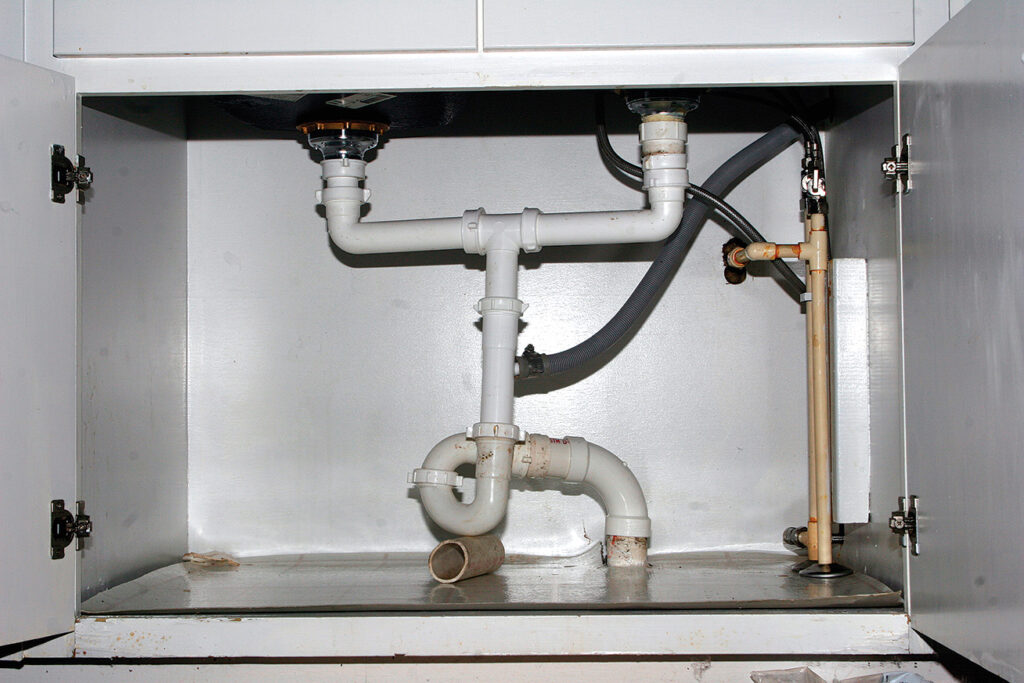
Understanding the Plumbing Under Your Sink
The area under your kitchen sink, though often overlooked, is a complex network of pipes, connections, and fixtures. Understanding its components is the first step in identifying and addressing leaks. The typical under-sink plumbing includes:
- Supply Lines: These flexible tubes deliver hot and cold water to the faucet.
- Shut-Off Valves: Located on the supply lines, these valves allow you to turn off the water supply in case of a leak or repair, preventing a potentially disastrous flood.
- Drain Pipes: These pipes carry wastewater away from the sink. They typically consist of a P-trap, a U-shaped pipe that traps debris and prevents sewer gases from entering your home.
- Garbage Disposal (if applicable): This appliance grinds food waste, which then flows into the drain pipes.
- Dishwasher Connection (if applicable): A hose connects the dishwasher to the drain system, allowing it to discharge wastewater.
Each of these components is a potential source of leaks. Regular inspection and maintenance are crucial for preventing water damage and costly repairs.
Common Causes of Leaks Under the Kitchen Sink
Several factors can contribute to leaks under the kitchen sink. Identifying the root cause is essential for implementing the correct solution. Some of the most common culprits include:
- Loose Connections: Over time, vibrations and temperature changes can loosen fittings on pipes, supply lines, and drain connections.
- Corroded Pipes: Older plumbing systems are susceptible to corrosion, which can weaken pipes and lead to leaks.
- Worn-Out Washers and O-Rings: These small rubber components create watertight seals in faucets and valves. Over time, they can dry out, crack, or become brittle, resulting in leaks.
- Clogged Drains: Blockages in the drain pipes can cause pressure to build up, leading to leaks at connection points.
- Damaged Supply Lines: Kinks, cracks, or punctures in the supply lines can cause water to spray or drip.
- Faulty Garbage Disposal: Leaks can occur at the disposal’s mounting ring, discharge tube, or internal seals.
Addressing these issues promptly can prevent minor drips from escalating into major floods.
Identifying the Source of the Leak
Pinpointing the exact location of a leak can be challenging, but a systematic approach can help you narrow down the source. Here’s a step-by-step guide:
- Dry the Area: Use paper towels or a clean cloth to thoroughly dry the area under the sink. This will make it easier to spot fresh drips.
- Inspect the Faucet: Check around the base of the faucet, the spout, and the handles for any signs of water.
- Examine the Supply Lines: Carefully inspect the supply lines for cracks, kinks, or leaks at the connections. Run your hand along the lines to feel for moisture.
- Check the Shut-Off Valves: Look for leaks around the valve stems and connections.
- Inspect the Drain Pipes: Examine the P-trap, drain connections, and garbage disposal (if applicable) for drips or signs of water damage.
- Run the Water: Turn on the faucet and let the water run for a few minutes. Observe the area under the sink for any new leaks.
- Check the Dishwasher Connection: If you have a dishwasher, run it through a cycle and check for leaks at the connection hose.
Using a flashlight can help you see into tight spaces and identify hard-to-spot leaks. If you’re still unsure, consider calling a professional plumber for assistance.
Tools and Materials for Repairing Leaks
Before attempting any repairs, gather the necessary tools and materials. Having everything on hand will make the process smoother and more efficient. Some essential items include:
- Adjustable Wrench: For tightening and loosening nuts and fittings.
- Pipe Wrench: For gripping and turning pipes.
- Basin Wrench: For reaching nuts and fittings in tight spaces under the sink.
- Screwdrivers: Both Phillips-head and flat-head screwdrivers may be needed.
- Plumber’s Tape (Teflon Tape): For sealing threaded connections.
- Plumber’s Putty: For sealing around drains and faucets.
- Replacement Washers and O-Rings: For repairing leaky faucets and valves.
- Bucket: For catching water.
- Towels or Rags: For cleaning up spills.
- Safety Glasses: To protect your eyes from debris.
- Gloves: To protect your hands.
Having these tools and materials readily available will enable you to tackle most common under-sink leaks effectively.
Step-by-Step Guide to Repairing Common Leaks
Once you’ve identified the source of the leak and gathered the necessary tools, you can begin the repair process. Here are some step-by-step instructions for addressing common types of leaks:
Tightening Loose Connections
- Turn off the water supply to the faucet using the shut-off valves.
- Use an adjustable wrench to gently tighten the loose connection. Be careful not to overtighten, as this could damage the fitting.
- Turn the water supply back on and check for leaks. If the leak persists, try disassembling the connection, cleaning the threads, and applying fresh plumber’s tape before reassembling.
Replacing Worn-Out Washers and O-Rings
- Turn off the water supply to the faucet.
- Disassemble the faucet according to the manufacturer’s instructions.
- Remove the old washers and O-rings and replace them with new ones of the same size and type.
- Reassemble the faucet and turn the water supply back on. Check for leaks.
Repairing Leaky Drain Pipes
- Place a bucket under the leaky drain connection to catch any water.
- Loosen the slip nuts on either side of the connection.
- Inspect the rubber washers inside the slip nuts. If they are damaged or worn, replace them.
- Reassemble the connection, making sure the slip nuts are snug but not overtightened.
- Run water down the drain and check for leaks.
Addressing Garbage Disposal Leaks
- Turn off the power to the garbage disposal at the circuit breaker.
- Inspect the mounting ring that connects the disposal to the sink. If it’s loose, tighten it with a screwdriver.
- Check the discharge tube connection. If it’s leaking, tighten the clamp or replace the tube.
- If the leak is coming from inside the disposal, it may need to be replaced.
If you’re uncomfortable performing any of these repairs yourself, don’t hesitate to call a professional plumber.
Preventing Future Leaks
Taking proactive steps can help prevent leaks under the kitchen sink and save you time, money, and headaches in the long run. Consider these preventive measures:
- Regular Inspections: Periodically inspect the area under your sink for any signs of moisture or leaks.
- Tighten Connections: Check and tighten loose connections on pipes, supply lines, and drain connections every few months.
- Replace Worn-Out Parts: Replace worn-out washers, O-rings, and supply lines before they fail.
- Avoid Harsh Chemicals: Avoid pouring harsh chemicals down the drain, as they can corrode pipes.
- Flush Regularly: Flush the drain with hot water regularly to prevent clogs.
- Properly Dispose of Food Waste: Avoid putting large amounts of food waste down the garbage disposal, as this can overload it and cause leaks.
By following these preventive measures, you can significantly reduce the risk of leaks under your kitchen sink.
When to Call a Professional Plumber
While many under-sink leaks can be repaired by homeowners, some situations require the expertise of a professional plumber. Consider calling a plumber if:
- You’re unable to identify the source of the leak.
- The leak is coming from inside a wall or floor.
- You’re dealing with corroded pipes that need to be replaced.
- You’re uncomfortable performing the repairs yourself.
- The leak is causing significant water damage.
A professional plumber has the knowledge, skills, and tools to diagnose and repair complex plumbing problems safely and effectively. Ignoring a serious leak can lead to extensive water damage, mold growth, and costly repairs.
The Crucial Role of Shut-Off Valves
Shut-off valves are arguably the most important part of the under-sink plumbing system. They allow you to quickly and easily turn off the water supply to the faucet in case of a leak or repair. Knowing how to locate and operate these valves is essential for preventing water damage. Make sure everyone in your household knows where the shut-off valves are and how to use them. Periodically test the valves to ensure they are functioning properly. If the valves are corroded or difficult to turn, have them replaced by a plumber.
Understanding P-Traps and Their Function
The P-trap is a U-shaped pipe located under the sink that plays a vital role in preventing sewer gases from entering your home. It traps a small amount of water, which acts as a barrier against these gases. The P-trap also catches debris that can clog the drain pipes. Periodically cleaning the P-trap can help prevent clogs and leaks. To clean the P-trap, place a bucket under the trap, loosen the slip nuts, and remove the trap. Empty the contents into the bucket and rinse the trap with water. Reassemble the trap, making sure the slip nuts are snug but not overtightened.
Ensuring a Dry Space Under Your Sink
Ultimately, maintaining a dry space under your kitchen sink requires vigilance and a proactive approach. Regular inspections, prompt repairs, and preventive measures can help you avoid the headaches and expenses associated with leaks. By understanding the components of your under-sink plumbing system and knowing how to address common issues, you can keep your kitchen dry and your home protected from water damage. Our commitment is to provide you with reliable information and expert guidance, empowering you to tackle home maintenance challenges with confidence.
