How to Replace a Broken Basic Faucet Turn Handle: A Comprehensive Guide
Is your faucet handle broken, making it difficult or impossible to turn the water on or off? Don’t worry, you’re not alone. A broken faucet handle is a common household problem. This comprehensive guide will walk you through the entire process of how to replace broken basic faucet turn handle, from identifying the problem to completing the installation. We’ll provide clear, step-by-step instructions, expert tips, and essential information to ensure a successful repair, saving you time and money.
This isn’t just another DIY guide. We’ve compiled years of plumbing experience and distilled it into an easy-to-follow resource. You’ll not only learn how to fix your faucet but also understand the underlying mechanisms, potential pitfalls, and how to choose the right replacement parts. Our goal is to equip you with the knowledge and confidence to tackle this repair like a pro. Let’s get started!
Understanding the Anatomy of a Basic Faucet and Its Handle
Before diving into the replacement process, it’s crucial to understand the basic components of a faucet. Knowing the parts will make the repair process smoother and help you avoid potential issues. A basic faucet typically consists of the following:
- Faucet Body: The main structure of the faucet, usually made of brass or chrome.
- Valve Stem: Controls the flow of water. When you turn the handle, the valve stem moves up or down, opening or closing the water passage.
- Handle: The part you grip and turn to operate the faucet. These come in various styles, from simple knobs to lever handles.
- Cartridge (or Washer): Depending on the faucet type, it uses either a cartridge or a washer to create a watertight seal.
- Aerator: Screws onto the faucet spout and mixes air with the water to create a smooth, splash-free flow.
- Escutcheon Plate: A decorative plate that covers the faucet base and mounting holes.
The handle is directly connected to the valve stem. When the handle breaks, it disrupts the mechanism controlling the water flow. Replacing the handle is often a straightforward fix, but choosing the right replacement is critical for proper functionality and aesthetics.
Identifying the Right Replacement Handle for Your Faucet
Finding the correct replacement handle is essential for a successful repair. A mismatched handle might not fit properly or could damage the valve stem. Here’s how to identify the right replacement:
- Determine the Faucet Brand and Model: Look for a brand name or model number on the faucet body, often near the base or under the spout. This information is crucial for finding compatible replacement parts.
- Check the Handle Type: Note the style of the handle (knob, lever, cross). Also, observe how it attaches to the valve stem (screw-on, push-on, etc.).
- Measure the Handle Dimensions: Measure the diameter of the handle base and the length of the stem connection point. These measurements will help you find a handle that fits snugly and operates smoothly.
- Consider the Material and Finish: Choose a handle made of durable material (brass, chrome, stainless steel) that matches the existing faucet finish. This will ensure both longevity and a consistent appearance.
- Take Pictures: Before removing the broken handle, take clear pictures of the faucet and handle from different angles. These pictures can be helpful when searching for a replacement online or at a hardware store.
If you’re unsure about the faucet brand or model, take the broken handle to a local plumbing supply store or hardware store. Their experts can help you identify the faucet and find a suitable replacement. Online plumbing supply websites also offer extensive catalogs and search tools to help you find the right part.
Tools and Materials Needed to Replace a Broken Faucet Handle
Before starting the replacement process, gather all the necessary tools and materials. Having everything on hand will save you time and prevent frustration.
- New Faucet Handle: The correct replacement handle for your faucet.
- Screwdriver Set: Both Phillips and flathead screwdrivers, in various sizes.
- Adjustable Wrench: For loosening or tightening nuts and bolts.
- Penetrating Oil: To loosen stubborn screws or connections.
- Clean Cloth or Rag: To wipe up spills and clean the faucet.
- Plumber’s Tape: For sealing threaded connections (if needed).
- Safety Glasses: To protect your eyes from debris.
- Gloves: To protect your hands.
Optional but helpful tools:
- Basin Wrench: For reaching hard-to-access nuts under the sink.
- Pliers: For gripping and manipulating small parts.
- Small Container: To hold screws and small parts.
Having the right tools and materials is half the battle. Take a moment to organize your workspace and ensure everything is within reach before you begin.
Step-by-Step Guide to Replacing a Broken Basic Faucet Turn Handle
Now, let’s get to the actual replacement process. Follow these step-by-step instructions carefully:
- Turn Off the Water Supply: Locate the shut-off valves under the sink. Turn both the hot and cold water valves clockwise until they are completely closed. If you can’t find shut-off valves under the sink, you may need to turn off the main water supply to your house.
- Protect the Sink: Place a towel or cloth in the sink to protect it from scratches and prevent small parts from falling down the drain.
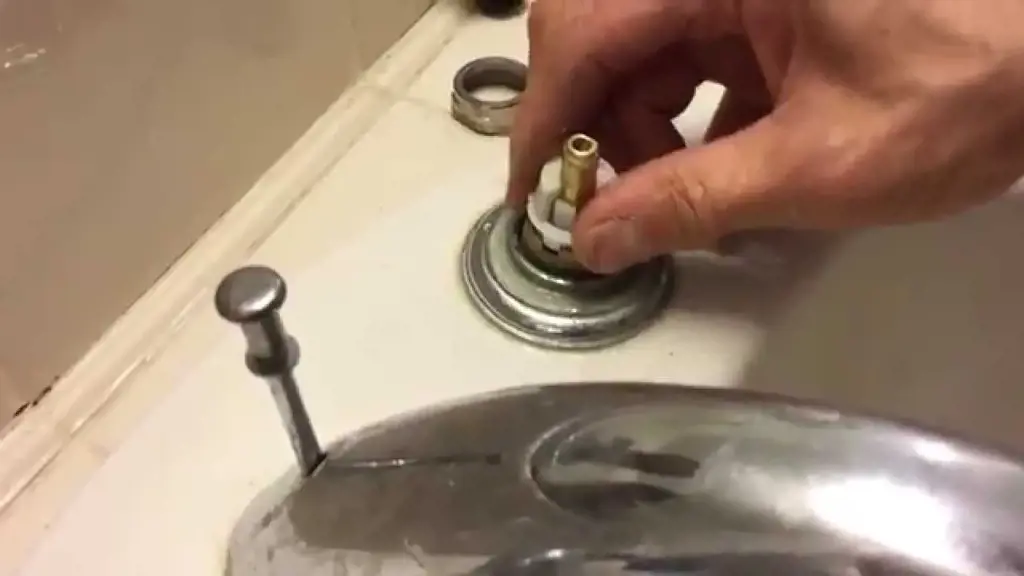
- Remove the Old Handle: Examine the old handle for a screw or set screw. It’s often located on the front, side, or top of the handle. Use the appropriate screwdriver to loosen and remove the screw. If the handle is stuck, apply penetrating oil and let it sit for a few minutes before trying again.
- Detach the Handle: Once the screw is removed, gently pull the handle straight off the valve stem. If it’s stuck, try wiggling it back and forth while pulling. Avoid using excessive force, as this could damage the valve stem.
- Clean the Valve Stem: Use a clean cloth to wipe the valve stem and remove any debris or corrosion.
- Install the New Handle: Align the new handle with the valve stem and push it firmly into place. Make sure the handle is properly seated and aligned.
- Secure the Handle: Insert the screw or set screw into the handle and tighten it securely with the appropriate screwdriver. Be careful not to overtighten, as this could damage the handle or valve stem.
- Test the Faucet: Slowly turn the water supply back on by opening the shut-off valves under the sink. Check for leaks around the handle and faucet base. Turn the handle to test the water flow and temperature.
- Make Adjustments: If you notice any leaks or the handle is not operating smoothly, turn off the water supply and make necessary adjustments. You may need to tighten the screw further or reposition the handle.
Congratulations! You’ve successfully replaced the broken faucet handle. This simple repair can save you a significant amount of money compared to hiring a plumber.
Troubleshooting Common Issues When Replacing a Faucet Handle
Even with careful preparation, you might encounter some challenges during the replacement process. Here are some common issues and how to address them:
- Handle Won’t Come Off: If the handle is stuck, apply penetrating oil and let it sit for several minutes. Gently wiggle the handle while pulling. If it still won’t budge, use a handle puller tool, available at most hardware stores.
- Screw is Stripped: If the screw is stripped, try using a rubber band or steel wool between the screwdriver and the screw head to improve grip. If that doesn’t work, you may need to use a screw extractor tool.
- New Handle Doesn’t Fit: Double-check that you have the correct replacement handle for your faucet model. If the handle is slightly too small, you may be able to use shims or washers to create a snug fit. If the handle is too large, you may need to return it and find a smaller size.
- Leak After Replacement: If you notice a leak after replacing the handle, turn off the water supply and inspect the handle and valve stem for damage. Make sure the handle is properly seated and the screw is tightened securely. You may also need to replace the O-rings or washers inside the faucet.
Addressing these issues promptly will help you complete the repair successfully and prevent further damage to your faucet.
Preventing Future Faucet Handle Breakage
While replacing a faucet handle is a relatively simple task, preventing future breakage is even better. Here are some tips to extend the lifespan of your faucet handles:
- Avoid Overtightening: When turning the faucet on or off, avoid using excessive force. Overtightening can put stress on the handle and valve stem, leading to breakage.
- Use the Right Tools: When tightening screws or nuts, use the correct size screwdriver or wrench. Using the wrong tool can damage the handle or valve stem.
- Regular Maintenance: Periodically inspect your faucet handles for signs of wear or damage. Tighten any loose screws and lubricate the valve stem with silicone grease.
- Choose Quality Handles: When replacing a broken handle, invest in a high-quality replacement made of durable materials. Cheap handles are more likely to break under normal use.
- Water Softener: Hard water can cause mineral buildup inside the faucet, making it harder to turn the handle and increasing the risk of breakage. Consider installing a water softener to reduce mineral buildup.
By following these preventative measures, you can significantly reduce the likelihood of future faucet handle breakage and keep your faucets functioning smoothly for years to come.
The Importance of Proper Faucet Maintenance
Maintaining your faucets goes beyond just replacing broken handles. Regular maintenance can prevent leaks, improve water efficiency, and extend the lifespan of your plumbing fixtures. Here are some key maintenance tasks:
- Check for Leaks: Regularly inspect your faucets for leaks around the base, spout, and handles. Even small leaks can waste a significant amount of water over time.
- Clean Aerators: Aerators can become clogged with mineral deposits, reducing water flow. Unscrew the aerator and clean it with vinegar or a descaling solution.
- Lubricate Valve Stems: Periodically lubricate the valve stems with silicone grease to keep them moving smoothly and prevent corrosion.
- Replace Worn Washers and O-Rings: Worn washers and O-rings can cause leaks. Replace them as needed to maintain a watertight seal.
- Tighten Loose Connections: Check all connections under the sink for tightness. Loose connections can cause leaks and water damage.
By incorporating these maintenance tasks into your regular home maintenance routine, you can keep your faucets in top condition and avoid costly repairs.
Choosing the Right Faucet for Your Needs
Sometimes, instead of just replacing the handle, it might be time to replace the entire faucet. When choosing a new faucet, consider the following factors:
- Style: Choose a faucet style that complements your bathroom or kitchen decor.
- Functionality: Select a faucet with features that meet your needs, such as a pull-down sprayer or touchless operation.
- Material: Opt for a faucet made of durable materials, such as brass or stainless steel.
- Finish: Choose a finish that is resistant to corrosion and easy to clean.
- Water Efficiency: Look for a faucet with a WaterSense label, indicating that it meets EPA standards for water conservation.
Researching different faucet options and reading reviews can help you make an informed decision and choose a faucet that will provide years of reliable service. Brands like Moen, Delta, and Kohler are known for their quality and durability. According to a 2024 industry report, these brands consistently receive high ratings from consumers and plumbing professionals.
Expert Advice on Faucet Repair and Replacement
For more complex faucet repairs or replacements, it’s always best to consult with a qualified plumber. Plumbers have the expertise and tools to diagnose and fix problems quickly and efficiently. They can also help you choose the right faucet for your needs and ensure that it is installed properly. Attempting to fix a complex plumbing problem yourself could lead to further damage and costly repairs. A common pitfall we’ve observed is homeowners underestimating the complexity of certain repairs, leading to bigger problems down the line.
Final Thoughts on Faucet Handle Replacement
Replacing a broken faucet handle is a manageable DIY project that can save you money and give you a sense of accomplishment. By following the steps outlined in this guide, you can confidently tackle this repair and keep your faucets functioning smoothly. Remember to always turn off the water supply before starting any plumbing work and to use the right tools and materials. Proper maintenance and timely repairs will extend the lifespan of your faucets and prevent costly problems down the road. Share your experiences with replace broken basic faucet turn handle in the comments below, and let us know if you have any additional tips or questions!
