Delta Wide Spread Kitchen Faucet Leaks at the Spout: Can I Fix It Without Shutting Off the Water?
Discovering a drip, drip, drip emanating from your Delta wide spread kitchen faucet’s spout is more than just an annoyance; it’s a potential waste of water and money. The immediate question that springs to mind is often, “Can I fix this delta wide spread kitchen faucetleaks at the spout can i fix it without shutting off the water without turning off the main water supply?” The answer, while not always straightforward, is often yes, at least temporarily. This comprehensive guide will walk you through the process of diagnosing the leak, attempting repairs without a full water shutoff, and understanding when a complete shutoff is absolutely necessary. We’ll draw upon our years of plumbing experience to provide you with practical, actionable advice that can save you time, money, and the hassle of a major plumbing undertaking. We aim to equip you with the knowledge to confidently tackle this common household problem.
Understanding the Source of Your Delta Faucet Leak
Before diving into repairs, it’s crucial to pinpoint the exact cause of the leak. Delta wide spread kitchen faucets, known for their elegant design and functionality, can develop leaks at the spout for various reasons. Identifying the culprit is the first step toward a successful and lasting fix. Here are some common causes:
- Worn-Out O-Rings and Seals: These small rubber components are essential for creating watertight connections within the faucet. Over time, they can degrade, crack, or become brittle, leading to leaks.
- Damaged Cartridge: The cartridge controls the flow of water and the mixing of hot and cold. A faulty or worn cartridge is a frequent cause of drips and leaks.
- Loose Connections: The various connections within the faucet assembly can loosen over time due to vibrations and water pressure changes.
- Corrosion or Mineral Buildup: Hard water can lead to mineral deposits that interfere with the faucet’s internal mechanisms, causing leaks. Corrosion can also damage the faucet’s components.
- High Water Pressure: Excessively high water pressure can stress the faucet’s seals and components, leading to premature wear and leaks.
Determining which of these issues is causing your specific leak is critical. Examine the faucet closely for any signs of visible damage, mineral buildup, or loose connections. Pay attention to when the leak occurs—is it constant, or only when the faucet is turned on or off?
Attempting Repairs Without Shutting Off the Water: A Strategic Approach
While a complete water shutoff is often recommended for plumbing repairs, there are situations where you can attempt a fix without it, especially for minor leaks. This approach requires careful planning and quick execution. Here’s how to proceed:
Step 1: Gather Your Tools and Supplies
Before you even think about touching the faucet, assemble everything you’ll need. This includes:
- Replacement O-rings and Seals: Having a variety of sizes on hand is recommended. You can often find generic kits at hardware stores, but ideally, source parts specifically designed for your Delta faucet model.
- Faucet Cartridge (if needed): If you suspect the cartridge is the issue, purchase a replacement cartridge compatible with your faucet model.
- Adjustable Wrench: For tightening loose connections.
- Screwdrivers (Phillips and Flathead): For disassembling the faucet handle and other components.
- Plumber’s Grease: To lubricate O-rings and seals for a better fit and longer life.
- Clean Rags or Towels: To absorb any water spillage.
- Small Container: To catch any drips while you’re working.
Step 2: Isolate the Problem Area
Even without shutting off the main water supply, you can often minimize the water flow to the spout by carefully positioning the faucet handles. For example, if the leak is more pronounced when the hot water is running, try adjusting the handle towards the cold side. This may reduce the pressure on the leaking component.
Step 3: The Quick Fix: O-Ring and Seal Replacement
This is often the most common and easily addressed cause of spout leaks. Here’s how to attempt a quick replacement:
- Carefully Disassemble the Faucet Handle: Use the appropriate screwdriver to remove the handle. Note the order of the parts as you disassemble them.
- Locate the O-Rings and Seals: They are typically located around the base of the spout or within the faucet body.
- Remove the Old O-Rings and Seals: Use a small, pointed tool (like a dental pick) to carefully remove the old O-rings. Be careful not to scratch the surrounding surfaces.
- Install the New O-Rings and Seals: Lubricate the new O-rings with plumber’s grease and carefully install them in their proper positions.
- Reassemble the Faucet Handle: Make sure all parts are properly aligned and tightened.
- Test for Leaks: Slowly turn on the water and check for any leaks around the spout.
Important Note: This entire process needs to be executed swiftly to minimize water spillage. If you’re not comfortable with this level of speed and precision, it’s best to shut off the water.
Step 4: Tightening Loose Connections
Carefully inspect all visible connections around the spout and faucet body. Use an adjustable wrench to gently tighten any loose connections. Be careful not to overtighten, as this can damage the fittings.
When a Full Water Shutoff is Absolutely Necessary
While attempting repairs without shutting off the water can be tempting, there are situations where it’s unavoidable. Ignoring these situations can lead to more significant water damage and costly repairs. Here are some scenarios that warrant a full water shutoff:
- Major Leaks: If the faucet is gushing water or the leak is significant, attempting a repair without shutting off the water is simply not feasible.
- Cartridge Replacement: Replacing the faucet cartridge typically requires disconnecting water lines, which necessitates a full shutoff.
- Corrosion or Damage: If you notice significant corrosion or damage to the faucet body or water lines, it’s best to shut off the water and call a professional plumber.
- Inability to Isolate the Leak: If you can’t pinpoint the source of the leak or if it’s coming from multiple locations, a full shutoff is necessary for a thorough inspection and repair.
- Lack of Confidence: If you’re not comfortable performing the repairs yourself or if you’re unsure about any step of the process, it’s always best to err on the side of caution and call a plumber.
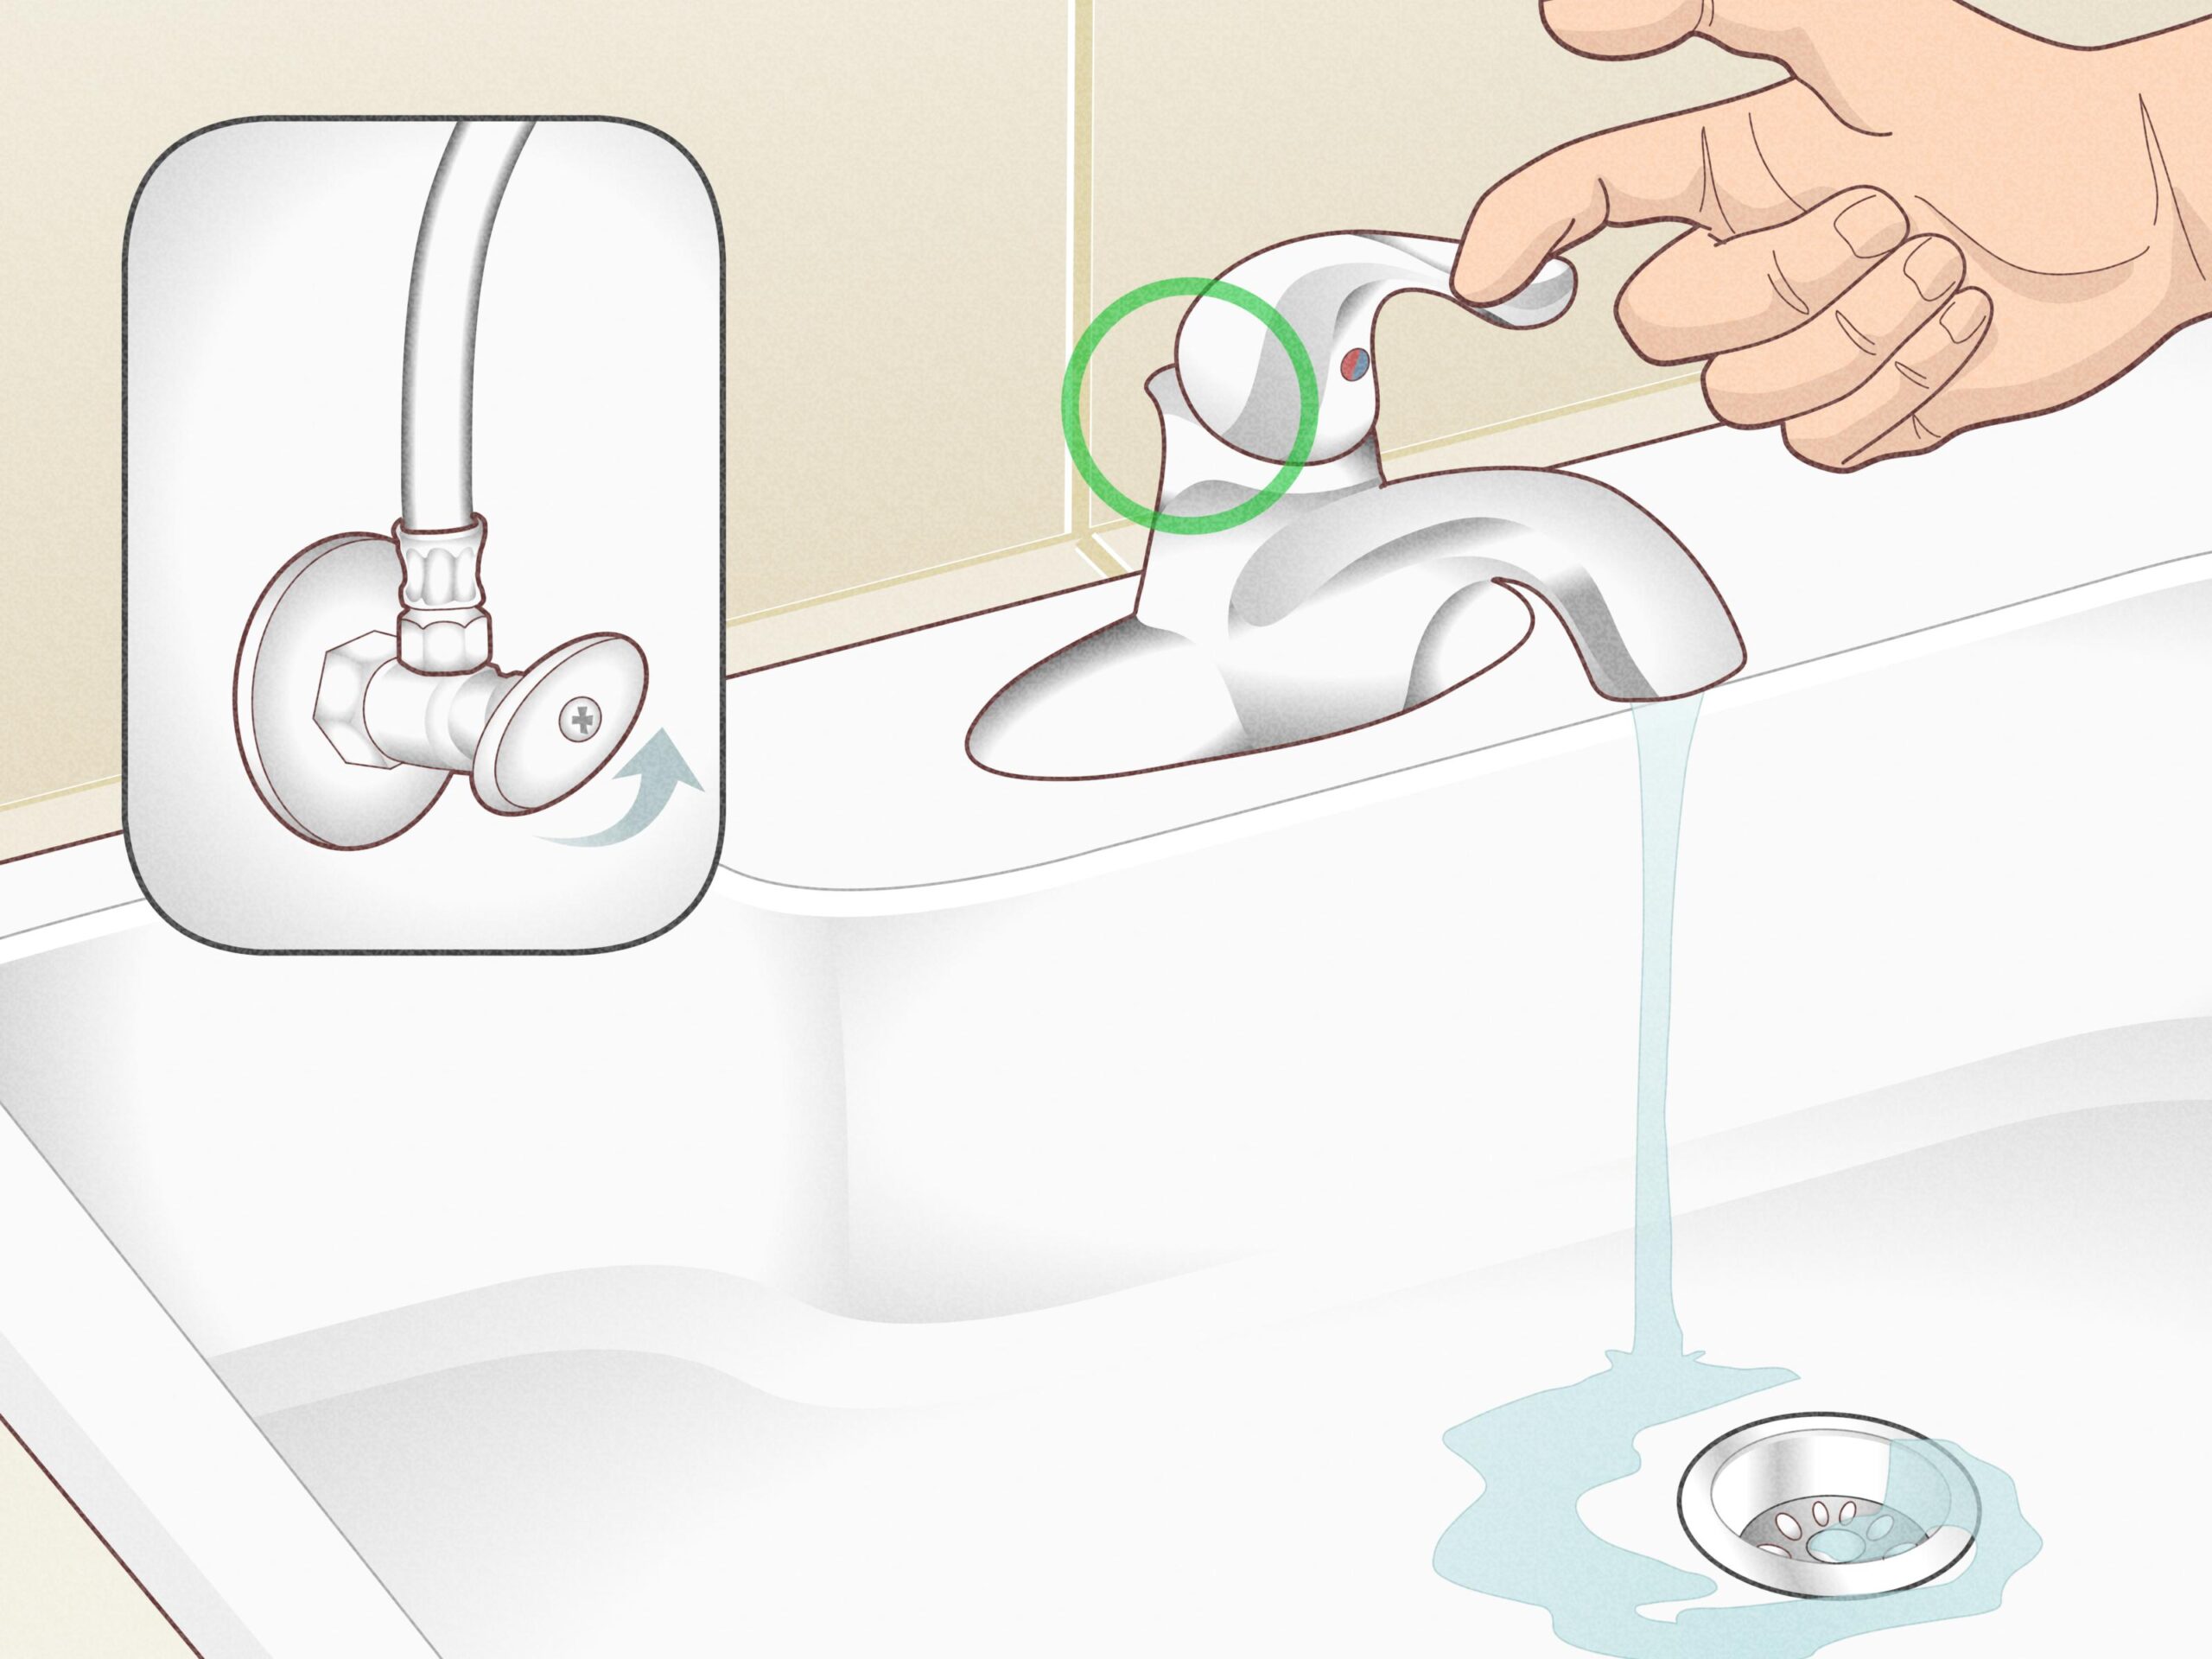
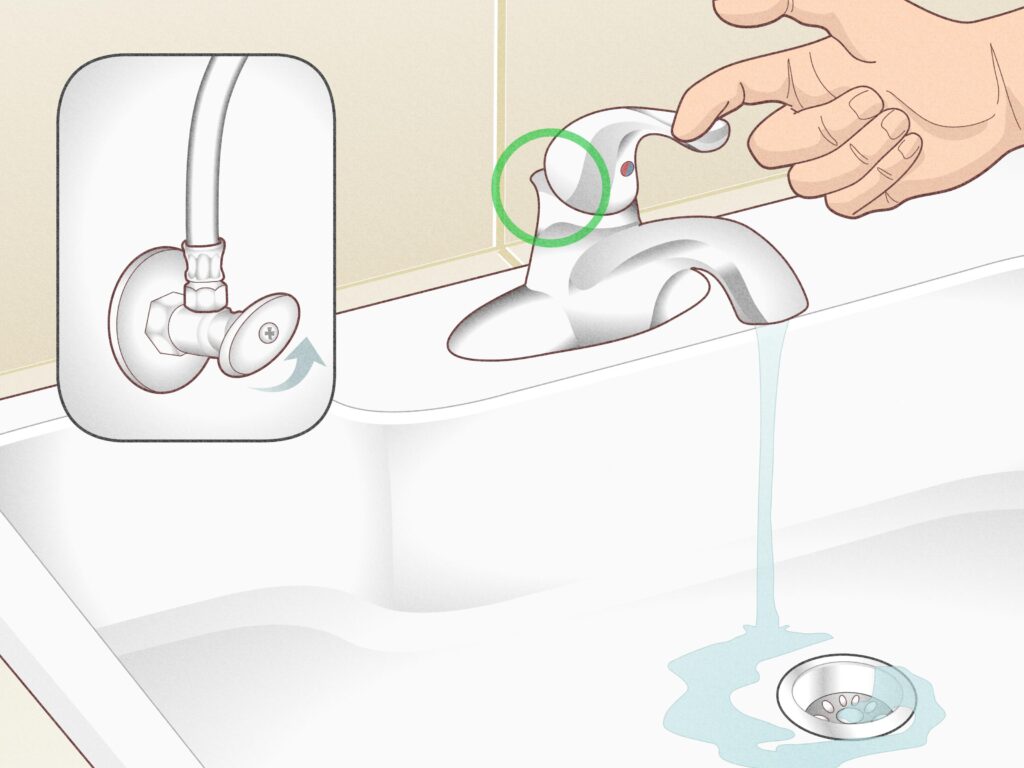
How to Shut Off the Water Supply to Your Kitchen Faucet
If you’ve determined that a full water shutoff is necessary, here’s how to do it:
- Locate the Shutoff Valves: Most kitchen sinks have individual shutoff valves for the hot and cold water lines located directly under the sink.
- Turn Off the Valves: Turn the valves clockwise until they are fully closed.
- Test the Shutoff: Turn on the faucet to ensure that the water is completely shut off. If water continues to flow, the valves may be faulty and need to be replaced.
- If No Local Valves Exist: If you don’t have local shutoff valves under the sink, you’ll need to shut off the main water supply to your house. This is typically located in the basement, garage, or near the water meter.
- Open the Faucet: After shutting off the water, open the faucet to relieve any pressure in the lines.
Essential Maintenance Tips to Prevent Future Leaks
Preventing leaks is always better than fixing them. Here are some essential maintenance tips to keep your Delta wide spread kitchen faucet in top condition:
- Regularly Inspect Your Faucet: Check for any signs of leaks, corrosion, or damage.
- Replace Worn O-Rings and Seals: Replace these components proactively, even if they’re not leaking yet. A good rule of thumb is to replace them every 2-3 years.
- Clean Mineral Deposits: Regularly clean the faucet spout and aerator to remove mineral deposits. You can use a mixture of vinegar and water.
- Adjust Water Pressure: If your water pressure is excessively high, consider installing a pressure regulator to protect your faucet and other plumbing fixtures.
- Lubricate Moving Parts: Periodically lubricate the faucet’s moving parts with plumber’s grease.
Choosing the Right Replacement Parts: A Critical Step
When replacing any parts in your Delta wide spread kitchen faucet, it’s crucial to use the correct replacement parts. Using generic or incompatible parts can lead to further leaks and damage. Here’s what to consider:
- Faucet Model Number: Identify your faucet’s model number. This is typically located on the faucet body or in the original documentation.
- Manufacturer’s Parts: Whenever possible, use genuine Delta replacement parts. These are designed specifically for your faucet model and will ensure a proper fit and optimal performance.
- Reputable Suppliers: Purchase replacement parts from reputable plumbing supply stores or online retailers.
- Check Compatibility: Before purchasing any parts, double-check that they are compatible with your faucet model.
Seeking Professional Help: When to Call a Plumber
While many faucet leaks can be fixed with DIY repairs, there are situations where it’s best to call a professional plumber. Here are some signs that you need expert assistance:
- Complex Repairs: If the leak is caused by a complex issue, such as a damaged faucet body or internal plumbing, it’s best to leave the repairs to a professional.
- Persistent Leaks: If you’ve attempted to fix the leak yourself but it persists, there may be an underlying issue that requires professional diagnosis and repair.
- Lack of Experience: If you’re not comfortable performing plumbing repairs yourself, it’s always best to call a plumber.
- Warranty Concerns: Attempting DIY repairs may void the warranty on your faucet.
Delta Faucet Technology and Leak Prevention
Delta Faucet has consistently innovated to improve faucet reliability and minimize leaks. Their Diamond Seal Technology, for example, utilizes a diamond-embedded ceramic disc that reduces wear and tear on the valve, leading to longer-lasting leak-free performance. Understanding the technology in your specific Delta faucet can help you better diagnose and prevent potential leaks.
Understanding Wide Spread Faucet Design
Wide spread faucets, characterized by their separate handles and spout mounted independently on the countertop, offer a distinctive aesthetic. However, this design can sometimes make leak diagnosis slightly more complex due to the increased number of connection points. When troubleshooting a leak, be sure to carefully examine each connection point – the base of each handle and the base of the spout – for any signs of water escape.
The Long-Term Cost of Ignoring Faucet Leaks
While a small drip may seem insignificant, the cumulative effect of a leaking faucet can be substantial. Not only does it waste water, leading to higher water bills, but it can also cause water damage to your countertop, cabinets, and flooring. Addressing leaks promptly can save you money and prevent more costly repairs down the road.
Finding a Solution That Works
Fixing delta wide spread kitchen faucetleaks at the spout, even without shutting off the water, is often achievable with the right approach. By carefully diagnosing the problem, gathering the necessary tools and supplies, and following the steps outlined in this guide, you can often resolve minor leaks quickly and efficiently. Remember to prioritize safety and call a professional plumber when necessary. Regular maintenance and prompt attention to leaks will keep your Delta faucet functioning flawlessly for years to come.
