Achieving a Flawless, Durable Gloss Paint Finish for Your Cabinets
Dreaming of cabinets that gleam with a smooth, reflective surface? A high-gloss paint finish can transform your kitchen or bathroom, adding a touch of modern elegance and sophistication. But achieving that perfect, durable shine requires more than just a can of glossy paint. This comprehensive guide will walk you through everything you need to know about achieving a professional-quality paint finish for cabinets gloss, from preparation to application, ensuring a stunning and long-lasting result.
Unlike matte or satin finishes, a gloss finish reflects light intensely, creating a vibrant and eye-catching look. However, this also means that imperfections are more noticeable. Proper preparation and meticulous application are crucial for success. We’ll delve into the best types of paint, the necessary tools, and the techniques that professionals use to create flawless, high-gloss cabinet finishes. Whether you’re a seasoned DIYer or just starting out, this guide will provide you with the knowledge and confidence to tackle your cabinet painting project with expert precision.
Understanding the Allure and Challenges of High-Gloss Cabinet Finishes
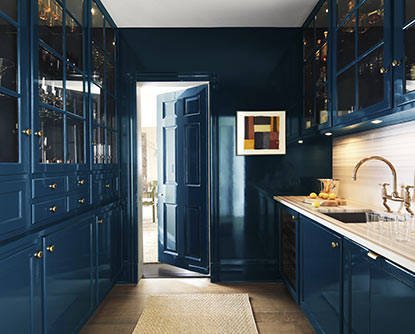
The appeal of a gloss paint finish for cabinets lies in its ability to brighten a space and create a sense of luxury. The reflective surface bounces light around the room, making it feel more open and airy. Gloss finishes are also incredibly durable and easy to clean, resisting stains, scratches, and moisture – a significant advantage in kitchens and bathrooms.
However, the very properties that make gloss finishes desirable also present challenges. The high reflectivity accentuates any surface imperfections, such as dents, scratches, or unevenness. Therefore, meticulous preparation is paramount. The surface must be perfectly smooth and free of any blemishes before applying the first coat of paint. Furthermore, gloss paints tend to show brushstrokes and roller marks more readily than other finishes, requiring careful application techniques to achieve a smooth, even sheen.
Another consideration is the color selection. While gloss finishes can enhance the vibrancy of any color, they also tend to make colors appear slightly lighter. It’s essential to test your chosen color in a gloss finish on a small, inconspicuous area before committing to the entire project. Considering these factors upfront will set you on the path to achieving a stunning and durable paint finish for cabinets gloss.
Choosing the Right Paint for a High-Gloss Cabinet Finish
Selecting the right type of paint is critical for achieving a durable and beautiful gloss finish on your cabinets. While several options are available, two stand out as the most popular and effective choices: acrylic latex and alkyd paints. Each has its own set of advantages and disadvantages, so understanding their properties is crucial for making the right decision.
- Acrylic Latex Paints: These water-based paints are known for their ease of use, low VOC (volatile organic compounds) content, and excellent durability. They dry quickly, clean up easily with soap and water, and offer good resistance to chipping and fading. Acrylic latex paints are also less prone to yellowing over time compared to alkyd paints. However, they may not provide quite as hard or glossy a finish as alkyd paints, and they can be more susceptible to brushstrokes. For optimal results, choose a high-quality acrylic latex paint specifically formulated for cabinets and trim.
- Alkyd Paints: These oil-based paints are prized for their exceptional hardness, durability, and high-gloss sheen. They level out beautifully, minimizing brushstrokes and creating a smooth, glass-like finish. Alkyd paints are also highly resistant to stains, scratches, and moisture, making them an excellent choice for high-traffic areas like kitchens and bathrooms. However, they have a higher VOC content than acrylic latex paints, requiring proper ventilation during application. They also dry more slowly and require mineral spirits for cleanup.
In recent years, hybrid paints that combine the best qualities of both acrylic and alkyd paints have emerged as a popular option. These paints offer the durability and leveling properties of alkyd paints with the low VOC content and easy cleanup of acrylic latex paints. Consider exploring these hybrid options for a balanced approach to achieving a stunning paint finish for cabinets gloss.
The Essential Tools and Materials for a Flawless Gloss Finish
Achieving a professional-quality paint finish for cabinets gloss requires not only the right paint but also the right tools and materials. Investing in high-quality supplies will make the job easier, faster, and ultimately, more successful. Here’s a comprehensive list of essential items:
- Cleaning Supplies: Degreaser, mild soap, clean cloths, tack cloth
- Surface Preparation: Sandpaper (various grits from 120 to 400), sanding block, wood filler (if needed), putty knife
- Priming: High-quality primer specifically designed for cabinets, paint tray, paint roller (foam or microfiber), paint brush (angled sash brush)
- Painting: Your chosen high-gloss paint, paint thinner (if using alkyd paint), paint strainer
- Application Tools: High-density foam rollers (2-4 inch), fine-bristle paint brushes (synthetic), paint sprayer (optional, but highly recommended for a flawless finish)
- Safety Gear: Safety glasses, respirator or mask, gloves
- Miscellaneous: Drop cloths, painter’s tape, stir sticks, clean containers for paint
Consider a paint sprayer for achieving the ultimate smooth, professional look. While it requires a bit of a learning curve, a sprayer can eliminate brushstrokes and roller marks, resulting in a flawless paint finish for cabinets gloss. If you opt for a sprayer, be sure to practice on a scrap piece of wood before tackling your cabinets.
Step-by-Step Guide to Achieving a Mirror-Like Gloss on Your Cabinets
Now that you’ve gathered your supplies and chosen your paint, it’s time to dive into the step-by-step process of achieving a stunning paint finish for cabinets gloss. This detailed guide will walk you through each stage, from preparation to the final coat, ensuring a professional-quality result.
- Preparation is Key:
- Remove Hardware: Take off all knobs, pulls, hinges, and other hardware. Store them in a safe place to avoid losing any pieces.
- Clean Thoroughly: Use a degreaser to remove any grease or grime from the cabinet surfaces. Follow with a mild soap and water solution to remove any remaining residue. Rinse well and allow the cabinets to dry completely.
- Sand the Surfaces: Use 120-grit sandpaper to lightly scuff the existing finish. This will help the primer adhere properly. If there are any dents or scratches, fill them with wood filler and sand smooth. Progress to finer grits (220 and then 320) for an ultra-smooth surface.
- Remove Dust: Use a tack cloth to remove all traces of sanding dust. This is crucial for achieving a flawless finish.
- Tape Off Areas: Use painter’s tape to protect any areas you don’t want to paint, such as walls, countertops, or the inside of the cabinets.
- Priming for Perfection:
- Apply Primer: Apply a thin, even coat of high-quality primer specifically designed for cabinets. Use a brush for corners and edges and a roller for larger surfaces.
- Allow to Dry: Let the primer dry completely according to the manufacturer’s instructions.
- Sand Lightly: Once the primer is dry, lightly sand it with 320-grit sandpaper to smooth out any imperfections.
- Remove Dust: Again, use a tack cloth to remove all sanding dust.
- Applying the Gloss Paint:
- Stir the Paint: Stir the paint thoroughly to ensure even color distribution.
- Apply Thin Coats: Apply the first coat of gloss paint in thin, even layers. Avoid applying too much paint at once, as this can lead to drips and runs. If using a sprayer, maintain a consistent distance and speed.
- Allow to Dry: Let the first coat dry completely according to the manufacturer’s instructions.
- Sand Lightly (Optional): If you notice any imperfections, lightly sand the first coat with 400-grit sandpaper. Be very gentle to avoid removing too much paint.
- Remove Dust: Use a tack cloth to remove any sanding dust.
- Apply Second Coat: Apply a second coat of gloss paint, again in thin, even layers.
- Allow to Dry Completely: Let the second coat dry completely for at least 24 hours, or longer if recommended by the manufacturer.
- Finishing Touches:
- Remove Tape: Carefully remove the painter’s tape.
- Reinstall Hardware: Reinstall all knobs, pulls, hinges, and other hardware.
- Inspect and Touch Up: Inspect the cabinets for any imperfections and touch up as needed.
By following these steps carefully, you can achieve a stunning and durable paint finish for cabinets gloss that will transform your kitchen or bathroom.
Achieving a Professional Finish: Spraying vs. Brushing
One of the biggest decisions you’ll face when aiming for a high-gloss cabinet finish is whether to use a paint sprayer or a brush and roller. Both methods have their pros and cons, and the best choice depends on your skill level, budget, and desired outcome.
- Spraying:
- Pros: Provides the smoothest, most professional finish. Eliminates brushstrokes and roller marks. Allows for faster application, especially on large surfaces.
- Cons: Requires a significant investment in equipment (paint sprayer, air compressor). Has a steeper learning curve. Requires more extensive masking and ventilation due to overspray.
- Brushing and Rolling:
- Pros: More affordable and accessible. Requires less masking and ventilation. Easier to control the paint application.
- Cons: More likely to leave brushstrokes or roller marks. Requires more time and effort to achieve a smooth finish. Can be more challenging to achieve a consistent sheen.
If you’re aiming for the absolute best possible paint finish for cabinets gloss, a paint sprayer is the way to go. However, if you’re on a budget or new to DIY painting, brushing and rolling can still yield excellent results with careful technique and high-quality tools. Regardless of the method you choose, remember that thin, even coats are key to avoiding drips and runs.
Maintaining the Lustre: Caring for Your Gloss-Finished Cabinets
Once you’ve achieved that perfect paint finish for cabinets gloss, it’s essential to take proper care of them to maintain their beauty and durability for years to come. Here are some tips for cleaning and maintaining your gloss-finished cabinets:
- Regular Cleaning: Wipe down your cabinets regularly with a soft, damp cloth to remove dust, fingerprints, and spills.
- Mild Soap and Water: For more stubborn stains, use a mild soap and water solution. Avoid harsh chemicals or abrasive cleaners, as these can damage the finish.
- Avoid Abrasive Materials: Never use scouring pads, steel wool, or other abrasive materials to clean your cabinets.
- Dry Thoroughly: After cleaning, dry your cabinets thoroughly with a clean, soft cloth.
- Touch Up Scratches: If you notice any scratches or chips, touch them up with a small amount of matching paint.
- Avoid Excessive Moisture: While gloss finishes are moisture-resistant, avoid prolonged exposure to excessive moisture. Wipe up spills immediately.
By following these simple maintenance tips, you can keep your paint finish for cabinets gloss looking its best for years to come.
Elevating Your Kitchen: The Enduring Appeal of Gloss Cabinets
In conclusion, achieving a stunning paint finish for cabinets gloss is within reach with the right knowledge, tools, and techniques. From understanding the nuances of gloss finishes to meticulously preparing the surfaces and applying thin, even coats of high-quality paint, every step contributes to a professional-quality result. Whether you opt for the smooth perfection of a paint sprayer or the accessibility of brushing and rolling, the key is to prioritize preparation, patience, and attention to detail.
The enduring appeal of gloss cabinets lies in their ability to transform a space, reflecting light, adding vibrancy, and creating a sense of modern elegance. More than just a cosmetic upgrade, a durable gloss finish protects your cabinets from the rigors of daily use, ensuring they remain beautiful for years to come. Now that you’re armed with this comprehensive guide, we encourage you to embark on your cabinet painting journey with confidence and creativity. Share your experiences and before-and-after photos in the comments below – we’d love to see your transformations!
