Mastering Marlin Model 60 Trigger Adjustment: A Visual Guide
The Marlin Model 60 is a beloved .22 caliber rifle, known for its reliability and affordability. However, like any firearm, its trigger pull can sometimes be less than ideal. Many shooters find the factory trigger to be heavy or gritty, impacting accuracy and overall shooting enjoyment. If you’re looking to improve your Marlin Model 60’s trigger, you’ve come to the right place. This comprehensive guide provides detailed marlin model 60 trigger adjustment instructions diagram images, offering a step-by-step approach to achieving a smoother, lighter, and more consistent trigger pull. We’ll delve into the process, potential pitfalls, and essential safety precautions, empowering you to fine-tune your rifle with confidence.
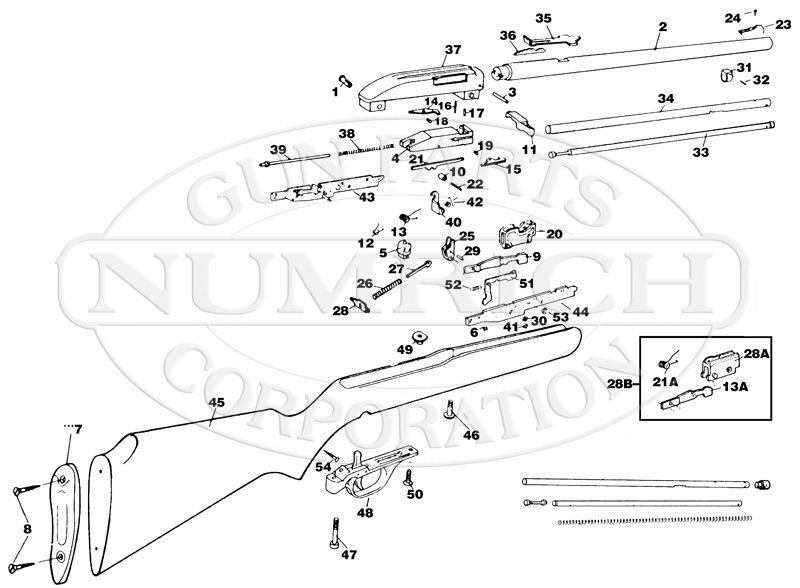
Understanding the Marlin Model 60 Trigger Mechanism
Before diving into the adjustment process, it’s crucial to understand the basics of the Marlin Model 60’s trigger mechanism. This knowledge provides a foundation for making informed adjustments and avoiding potential issues. The Model 60 utilizes a relatively simple, but effective trigger system. It relies on several key components working in harmony: the trigger itself, the sear, the disconnector, and the associated springs. The interaction of these parts determines the trigger pull weight, creep, and overall feel.
The sear is a critical component, as it’s responsible for holding the hammer back until the trigger is pulled. The disconnector ensures that the rifle can only fire one round per trigger pull. Over time, wear and tear, or even factory tolerances, can lead to inconsistencies in this system, resulting in a less-than-optimal trigger pull. Understanding how these components interact is the first step in achieving a better trigger experience.
Key Components and Their Roles
- Trigger: The lever that initiates the firing sequence.
- Sear: Holds the hammer until released by the trigger.
- Disconnector: Prevents automatic firing.
- Springs: Provide tension and reset functionality.
Essential Safety Precautions Before Trigger Adjustment
Safety is paramount when working on any firearm. Before beginning any trigger adjustment on your Marlin Model 60, adhere strictly to the following safety precautions:
- Ensure the Firearm is Unloaded: Visually inspect the chamber and magazine to confirm that the rifle is completely empty.
- Remove the Magazine: Always remove the magazine before any disassembly.
- Point the Muzzle in a Safe Direction: Keep the muzzle pointed away from yourself and others at all times.
- Wear Safety Glasses: Protect your eyes from any potential flying debris.
- Work in a Well-Lit Area: Ensure you have adequate lighting to clearly see all components.
- Consult the Owner’s Manual: Refer to your Marlin Model 60 owner’s manual for specific safety information and disassembly instructions.
Failing to follow these safety precautions could result in serious injury or death. Take your time, be meticulous, and prioritize safety above all else.
Tools and Materials Required for Marlin Model 60 Trigger Adjustment
Having the right tools and materials will make the trigger adjustment process smoother, safer, and more effective. Here’s a list of essential items:
- Screwdrivers: A set of gunsmithing screwdrivers with various sizes to avoid damaging screws.
- Punch Set: For removing pins without damaging the surrounding metal.
- Gunsmithing Hammer: A small, non-marring hammer for gentle tapping.
- Cleaning Supplies: Gun cleaning solvent, patches, and brushes to remove any dirt or grime.
- Lubricant: A high-quality gun lubricant to reduce friction and ensure smooth operation.
- Diagram/Images: A detailed marlin model 60 trigger adjustment diagram images to guide you through the process.
- Work Bench: A clean and organized workspace.
- Optional: Trigger Pull Gauge: To measure the trigger pull weight before and after adjustment.
Investing in quality tools will not only make the job easier but also help prevent damage to your firearm.
Step-by-Step Marlin Model 60 Trigger Adjustment Instructions with Diagrams
This section provides a detailed, step-by-step guide to adjusting the trigger on your Marlin Model 60. Refer to the accompanying marlin model 60 trigger adjustment diagram images for visual assistance. Note: Trigger adjustments can be complex and may void your warranty. If you’re not comfortable performing these modifications yourself, it’s best to consult a qualified gunsmith.
- Disassembly: Carefully disassemble the rifle, following the instructions in your owner’s manual. Pay close attention to the order of components and take pictures as you go to aid in reassembly.
- Locate the Sear and Trigger Components: Identify the sear, trigger, and associated springs. These are the components you’ll be working with.
- Polishing the Sear: Using a fine polishing stone or compound, carefully polish the sear engagement surfaces. This will help to reduce friction and create a smoother trigger pull. Do not remove too much material, as this could compromise the safety of the firearm.
- Adjusting the Trigger Spring: Some aftermarket kits or modifications involve replacing or adjusting the trigger spring. A lighter spring can reduce the trigger pull weight. However, ensure the spring is still strong enough to provide reliable reset.
- Lubrication: Apply a small amount of high-quality gun lubricant to the sear engagement surfaces and other moving parts.
- Reassembly: Carefully reassemble the rifle, ensuring all components are properly aligned and secured. Refer to your disassembly pictures and the owner’s manual.
- Testing: After reassembly, perform a thorough function test to ensure the rifle is operating safely and correctly. Check the trigger pull weight and feel.
- Fine-Tuning: If necessary, repeat steps 3-7 to fine-tune the trigger pull to your desired preference.
Important Considerations:
- Creep: Creep is the amount of movement the trigger has before the sear releases the hammer. Ideally, you want to minimize creep for a crisp, clean trigger pull.
- Over-travel: Over-travel is the amount of movement the trigger has after the sear releases the hammer. Excessive over-travel can make it difficult to maintain accuracy.
- Safety: Always prioritize safety. Ensure the trigger is functioning correctly and that the rifle is safe to operate after any adjustments.
Common Issues and Troubleshooting
Even with careful attention, you may encounter some common issues during trigger adjustment. Here are some troubleshooting tips:
- Trigger Not Resetting: This could be due to a weak trigger spring or excessive friction. Check the spring and ensure all components are properly lubricated.
- Light Trigger Pull: While a lighter trigger pull is desirable, a trigger that is too light can be unsafe. Ensure the sear is still engaging properly and that the rifle is not firing accidentally.
- Creep: If you’re experiencing excessive creep, try polishing the sear engagement surfaces further.
- Failure to Fire: This could be due to a weak hammer spring or improper sear engagement. Check the hammer spring and ensure the sear is properly engaging the hammer.
If you’re unable to resolve the issue, consult a qualified gunsmith.
Aftermarket Trigger Kits and Upgrades
For those who prefer a more straightforward approach, several aftermarket trigger kits and upgrades are available for the Marlin Model 60. These kits typically include a new sear, trigger, and springs, designed to provide a smoother, lighter, and more consistent trigger pull. Popular brands include:
- M*CARBO Marlin 60 Trigger Kit
- Volquartsen Firearms Trigger Kits
These kits can be a good option for those who are not comfortable performing more extensive modifications themselves. However, it’s still important to follow the manufacturer’s instructions carefully and to perform a thorough function test after installation. Always research and read reviews before purchasing any aftermarket parts to ensure compatibility and quality.
The Benefits of a Properly Adjusted Trigger
A properly adjusted trigger can significantly improve your shooting experience and accuracy with your Marlin Model 60. Here are some of the key benefits:
- Improved Accuracy: A lighter, smoother trigger pull reduces the amount of movement required to fire the rifle, leading to improved accuracy.
- Enhanced Shooting Experience: A crisp, clean trigger pull makes shooting more enjoyable.
- Increased Confidence: Knowing that your rifle is performing at its best can boost your confidence and improve your overall shooting performance.
- Greater Consistency: A properly adjusted trigger provides a more consistent trigger pull, allowing you to develop better shooting habits.
Ultimately, a well-tuned trigger enhances the overall connection between the shooter and the firearm, leading to better results and a more satisfying experience.
Maintaining Your Adjusted Trigger
Once you’ve adjusted your Marlin Model 60 trigger, it’s important to maintain it properly to ensure continued performance and reliability. Regular cleaning and lubrication are essential. After each shooting session, clean the trigger mechanism with a gun cleaning solvent and apply a small amount of high-quality gun lubricant to the moving parts. Periodically inspect the sear and trigger components for any signs of wear or damage. If you notice any issues, consult a qualified gunsmith.
Achieving Shooting Excellence with Your Marlin 60
Adjusting the trigger on your Marlin Model 60 can be a rewarding experience, leading to improved accuracy and a more enjoyable shooting experience. By following the marlin model 60 trigger adjustment instructions diagram images provided in this guide, you can confidently fine-tune your rifle to your desired preferences. Remember to prioritize safety, take your time, and consult a qualified gunsmith if you’re unsure about any aspect of the process. With a properly adjusted trigger, you’ll be well on your way to achieving shooting excellence with your Marlin Model 60. Share your experiences with Marlin Model 60 trigger adjustments in the comments below; we’d love to hear from you!
