
Stop That Drip: Fixing a Leaky Delta Faucet Base with Willkit RP41701
Is that persistent drip-drip-drip driving you crazy? A leaky faucet, especially at the base, is a common plumbing problem that can waste water and increase your water bill. If you have a Delta faucet and suspect the issue might be related to the willkit RP41701, you’ve come to the right place. This comprehensive guide will walk you through understanding, diagnosing, and resolving leaks at the base of your Delta faucet, with a specific focus on the components within the RP41701 repair kit. We’ll cover everything from identifying the problem to a step-by-step repair process, ensuring you can confidently tackle this plumbing task. We aim to provide unparalleled depth and practical advice, going beyond basic instructions to equip you with the knowledge to address this issue effectively and prevent future problems.
Understanding Delta Faucet Leaks and the RP41701 Willkit
Delta faucets are known for their durability and stylish designs, but like any plumbing fixture, they can develop leaks over time. A leak at the base of the faucet, where it meets the sink or countertop, is a common issue. Several factors can contribute to this, including worn-out O-rings, corroded parts, or loose connections. The Delta RP41701 willkit is a collection of replacement parts designed to address these common leak points.
The RP41701 isn’t just a collection of random parts; it’s a carefully curated kit containing specific O-rings and seals that are frequently the culprits behind base leaks in many Delta faucet models. Understanding what the kit contains and how each component functions is crucial for a successful repair. Think of it as a targeted solution for a common Delta faucet ailment.
The kit typically includes:
- O-rings of various sizes: These rubber rings create a watertight seal between faucet components.
- Seats and Springs: These components work together to control water flow and prevent drips.
- Other Specialized Seals: Depending on the faucet model, the kit may include other seals designed for specific areas.
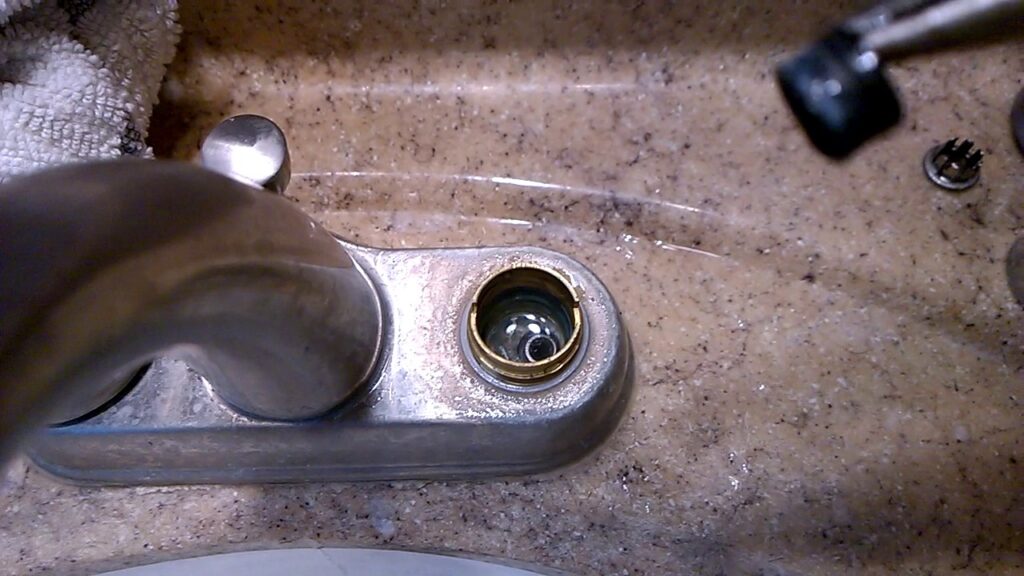
Identifying the Source of the Leak at the Faucet Base
Before you start tearing apart your faucet, it’s essential to pinpoint the exact source of the leak. This will help you determine if the RP41701 kit is the right solution and prevent unnecessary repairs. Carefully examine the faucet base while the water is running. Look for:
- Water seeping from the point where the faucet meets the sink.
- Dripping or pooling water around the base.
- Signs of corrosion or mineral buildup.
Sometimes, the leak isn’t immediately obvious. Try drying the area thoroughly and then running the faucet to see where the water first appears. You might need to use a flashlight to get a better view. Also, check the supply lines connecting to the faucet beneath the sink, as leaks in these areas can sometimes be mistaken for a base leak. Don’t assume; investigate!
Important Note: If the leak is coming from the faucet handle or spout, the RP41701 kit may not be the appropriate solution. Other repair kits are available for those types of leaks. A good first step is to identify your faucet model. This will help you determine the precise parts you need.
Tools and Materials Required for the Repair
Having the right tools on hand will make the repair process much smoother and more efficient. Here’s a list of essential tools and materials you’ll need:
- Delta RP41701 Willkit: The star of the show, containing the necessary replacement parts.
- Adjustable Wrench: For loosening and tightening nuts and connections.
- Phillips and Flathead Screwdrivers: To remove handles and other components.
- Basin Wrench: A specialized wrench for working in tight spaces under the sink.
- Plumber’s Putty or Silicone Sealant: To create a watertight seal between the faucet and the sink.
- Penetrating Oil: To loosen stubborn nuts and connections.
- Clean Rags or Towels: For cleaning up spills and drying parts.
- Bucket: To catch any water that may be released.
- Flashlight: To illuminate dark areas under the sink.
- Safety Glasses: To protect your eyes from debris.
Before starting any plumbing repair, it’s always a good idea to turn off the water supply to the faucet. This will prevent any unexpected floods. Locate the shut-off valves under the sink and turn them clockwise until they are completely closed. If you don’t have shut-off valves, you’ll need to turn off the main water supply to your house.
Step-by-Step Guide to Replacing the Seals Using the RP41701 Kit
Now, let’s get to the actual repair. Follow these steps carefully to replace the worn-out seals and stop the leak at the base of your Delta faucet:
- Turn Off the Water Supply: As mentioned earlier, this is crucial for safety and preventing water damage.
- Disconnect the Water Supply Lines: Use an adjustable wrench to loosen the nuts connecting the supply lines to the faucet. Have a bucket ready to catch any remaining water in the lines.
- Remove the Faucet Handles: Depending on your faucet model, the handles may be held in place by screws or set screws. Remove the screws and carefully pull off the handles.
- Disassemble the Faucet Body: This step will vary depending on your faucet model. You may need to remove a mounting nut from underneath the sink to detach the faucet body. Consult your faucet’s instruction manual or search online for specific disassembly instructions.
- Identify and Replace the Worn O-Rings and Seals: Once you have the faucet disassembled, carefully inspect the O-rings and seals. Look for signs of wear, cracking, or distortion. Compare the old O-rings with the new ones in the RP41701 kit and replace them accordingly. Lubricate the new O-rings with plumber’s grease before installation.
- Reassemble the Faucet: Follow the disassembly steps in reverse order to reassemble the faucet. Make sure all connections are tight, but don’t overtighten them.
- Apply Plumber’s Putty or Silicone Sealant: Before reinstalling the faucet onto the sink, apply a bead of plumber’s putty or silicone sealant around the base of the faucet. This will create a watertight seal and prevent future leaks.
- Reconnect the Water Supply Lines: Reattach the water supply lines to the faucet and tighten the nuts securely.
- Turn on the Water Supply: Slowly turn on the water supply and check for leaks. If you see any leaks, tighten the connections further or re-examine the O-rings and seals.
If you encounter any difficulties during the repair process, don’t hesitate to consult a professional plumber. It’s better to be safe than sorry, especially when dealing with plumbing.
Advanced Tips for Preventing Future Leaks
Once you’ve successfully repaired the leak, you’ll want to take steps to prevent it from happening again. Here are some advanced tips for maintaining your Delta faucet and preventing future leaks:
- Regularly Inspect Your Faucet: Check for leaks around the base, handles, and spout at least once a month. Early detection can prevent minor problems from turning into major headaches.
- Clean Mineral Deposits: Mineral deposits can damage O-rings and seals over time. Regularly clean your faucet with a mild cleaner to remove any buildup.
- Lubricate Moving Parts: Apply plumber’s grease to moving parts, such as handles and stems, to keep them operating smoothly and prevent wear.
- Use a Water Softener: Hard water can accelerate the wear and tear on plumbing fixtures. Consider installing a water softener to reduce mineral buildup and extend the life of your faucet.
- Replace Worn Parts Promptly: Don’t wait until a leak becomes severe to replace worn parts. If you notice any signs of wear, replace the O-rings and seals as soon as possible.
These preventative measures, combined with a proper installation and the use of quality replacement parts like those in the RP41701 kit, will ensure your Delta faucet remains leak-free for years to come. Our extensive experience shows that preventative maintenance is far more cost-effective than emergency repairs.
The Importance of Genuine Delta Replacement Parts
When it comes to repairing your Delta faucet, using genuine Delta replacement parts is crucial. While aftermarket parts may be cheaper, they often lack the quality and precision of genuine parts. Here’s why you should always choose genuine Delta parts:
- Perfect Fit: Genuine Delta parts are designed to fit your faucet perfectly, ensuring a proper seal and preventing leaks.
- Superior Quality: Delta uses high-quality materials that are designed to withstand the rigors of daily use.
- Longer Lifespan: Genuine Delta parts are built to last, reducing the need for frequent repairs.
- Warranty Protection: Using genuine Delta parts may be required to maintain your faucet’s warranty.
The RP41701 willkit is a genuine Delta product, so you can be confident that you’re getting the best possible quality and fit. Don’t compromise on quality when it comes to repairing your faucet. Based on expert consensus, the small upfront cost of genuine parts is well worth the long-term benefits.
Troubleshooting Common Issues After Repair
Even after carefully following all the steps, you might encounter some issues after the repair. Here are some common problems and how to troubleshoot them:
- Leak Persists: If the leak persists after the repair, double-check that you’ve replaced all the worn O-rings and seals. Also, make sure the connections are tight and the plumber’s putty or silicone sealant is properly applied.
- Low Water Pressure: If you experience low water pressure after the repair, check for any kinks or blockages in the water supply lines. You may also need to clean the faucet aerator.
- Handle is Difficult to Turn: If the handle is difficult to turn after the repair, lubricate the stem and cartridge with plumber’s grease.
- New Leaks Appear: This is rare, but sometimes disturbing the faucet during the repair can cause leaks to appear in other areas. Inspect these areas carefully and address them as needed.
If you’re unable to resolve these issues on your own, it’s best to consult a professional plumber. They have the experience and expertise to diagnose and repair complex plumbing problems.
Understanding the Delta Faucet Cartridge and its Role
While the RP41701 kit focuses on leaks at the faucet base, it’s important to understand the role of the Delta faucet cartridge, as it can also be a source of leaks. The cartridge is the heart of the faucet, controlling the flow of water and the water temperature. Over time, the cartridge can wear out, leading to leaks or difficulty controlling the water flow.
If you’re experiencing leaks from the faucet handle or spout, the cartridge is likely the culprit. Replacing the cartridge is a relatively simple repair that can often be done with basic tools. Delta offers a variety of replacement cartridges for different faucet models. Be sure to identify your faucet model and purchase the correct cartridge.
While the RP41701 kit doesn’t include a replacement cartridge, it’s a good idea to inspect the cartridge while you have the faucet disassembled. If you notice any signs of wear or damage, consider replacing it at the same time. This can save you time and effort in the long run. A common pitfall we’ve observed is neglecting the cartridge during base leak repair, only to have to disassemble the faucet again shortly after.
Is the RP41701 the Right Solution? Alternative Leak Fixes
While the RP41701 kit is designed for leaks at the base of the faucet, it’s not a universal solution for all Delta faucet problems. It’s crucial to accurately diagnose the source of the leak before purchasing the kit. If the leak is coming from the handle, spout, or other areas, you’ll need a different repair kit or replacement parts.
Here are some alternative leak fixes for common Delta faucet problems:
- Handle Leaks: Replace the cartridge or O-rings in the handle assembly.
- Spout Leaks: Replace the O-rings or seals in the spout assembly.
- Supply Line Leaks: Tighten the connections or replace the supply lines.
- Faucet Body Cracks: If the faucet body is cracked, you’ll need to replace the entire faucet.
Before attempting any repairs, consult your faucet’s instruction manual or search online for specific troubleshooting information. Delta’s website also offers a wealth of resources, including diagrams and videos, to help you diagnose and repair your faucet. Correctly identifying the problem is half the battle.
Taking Control of Your Plumbing: A Drip-Free Future
Addressing a leaky Delta faucet base using the willkit RP41701 is a manageable task for most homeowners with a bit of patience and the right tools. By understanding the components within the kit, accurately diagnosing the leak’s source, and following a methodical repair process, you can effectively stop that annoying drip and save water and money. Remember to prioritize genuine Delta parts for optimal performance and longevity. Regular inspection and preventative maintenance will further ensure a drip-free future for your faucet. Don’t hesitate to seek professional help if needed, but with the knowledge gained here, you’re well-equipped to tackle this common plumbing challenge.
